Guide Sections
Sandbox Auditlogic & Control Test Guide - Azure
Control Test Detailed Reference
In this reference document, framework principles, population and evidence collection, evidence types, and assessment criteria will be provided. If a remediation bot exists for a particular test, this will also be annotated here.
Azure Control Tests Included
The following Azure Control Tests are included in your Azure Compliance Test Suite. More details are available in the Control Test Detailed Reference section below.
- AD Password Policy Enforcement
- Private and Secure Azure Blob Storage
- Production Azure VMs Have Daily Backup Policy
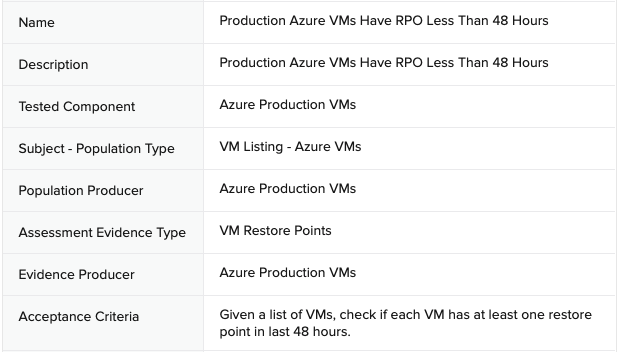
- Production Azure VMs Have RPO Less Than 48 Hours
- Critical Data Immutable for Seven Years
Control Test 1: AD Password Policy Enforcement
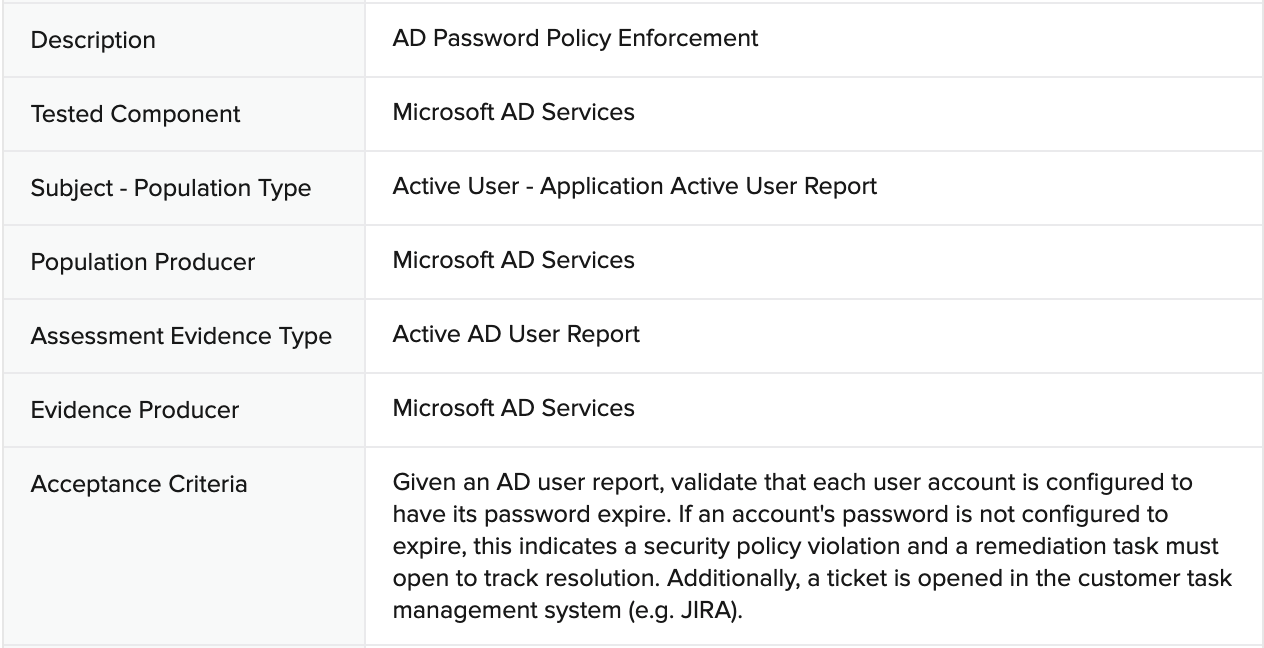
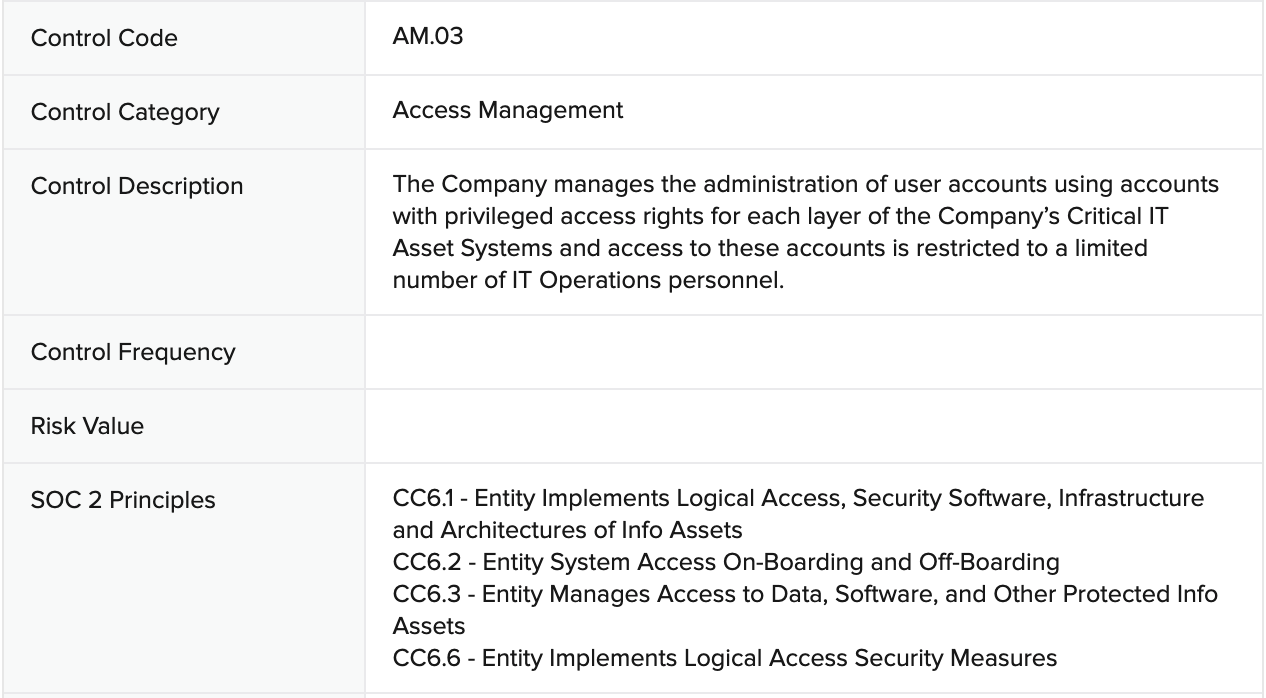
Sample Auditee SOC 2 Control and Principles
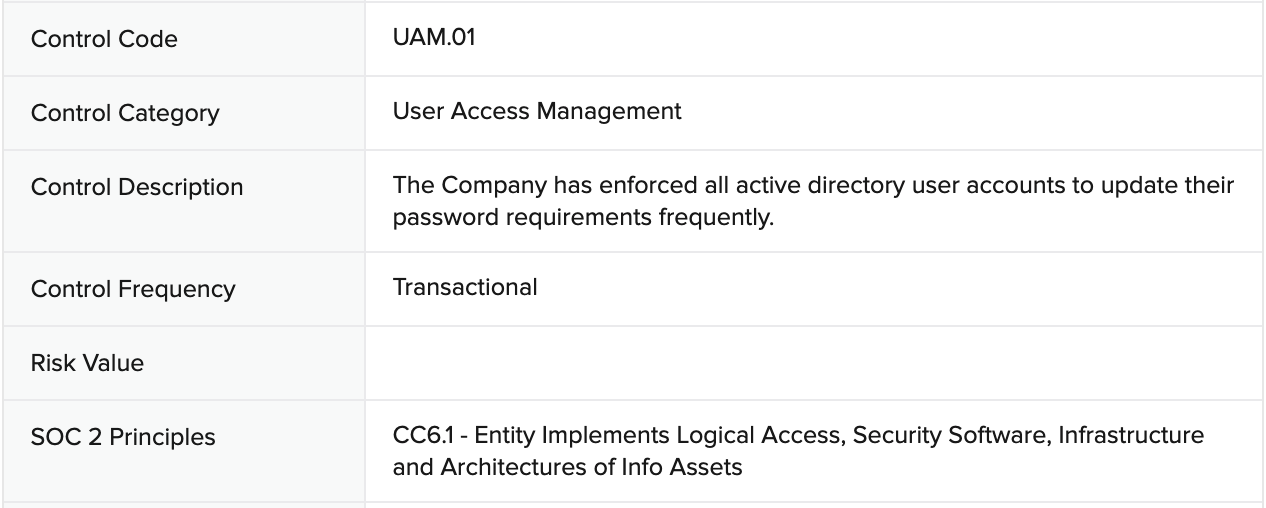
SOC 2 Template Controls and Principles

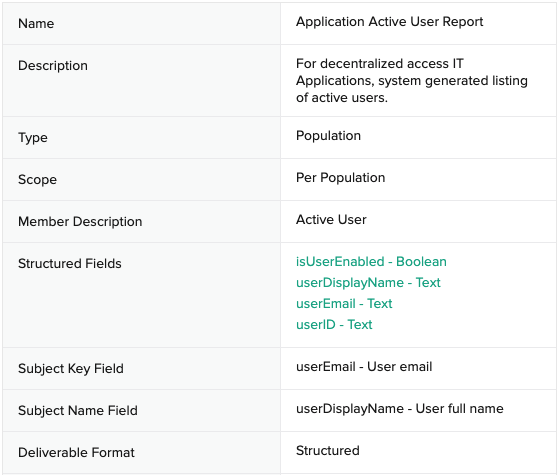
Population: Application Active User Report
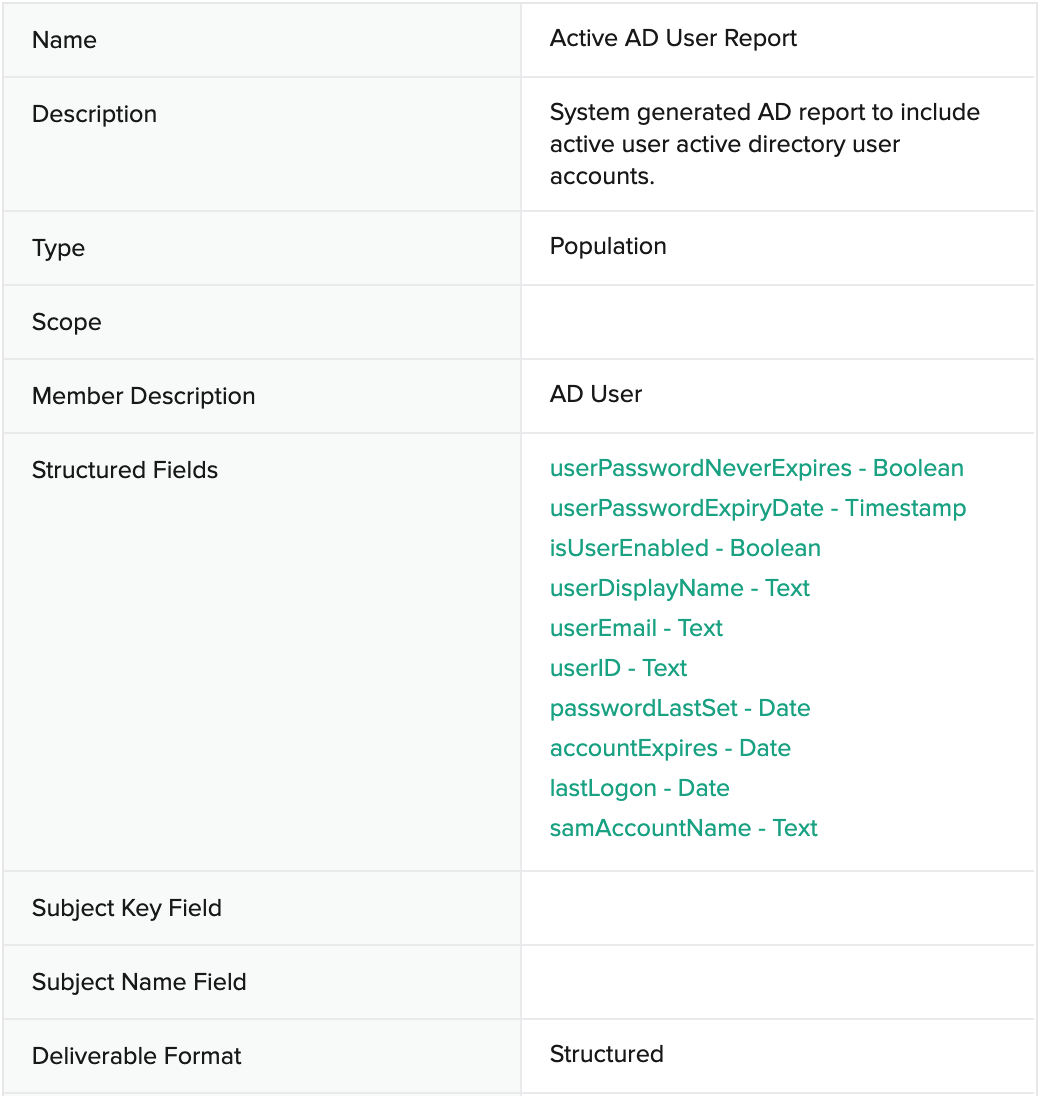
Evidence: Active AD User Report
Evidence Collection KB: How to get Active AD Users

Automated Assessment
Remediation Bot: ActiveDirectory Enable User Password Expiration
The remediation bot applies specific values to the userAccountControl property to set the password expiration policy to enabled/true.
65536: Do not expire password
66048: Enabled, password never expires
Toggling Test Outcome: AD Password Policy Enforcement
Please note, for the Azure Compliance Test Suite to function, the AD server VM MUST be in a running state. The AD server VM name ends with “-dc-1.”
Toggle to Fail
Based on the test assessment criteria, follow these instructions to create conditions for a failed test.
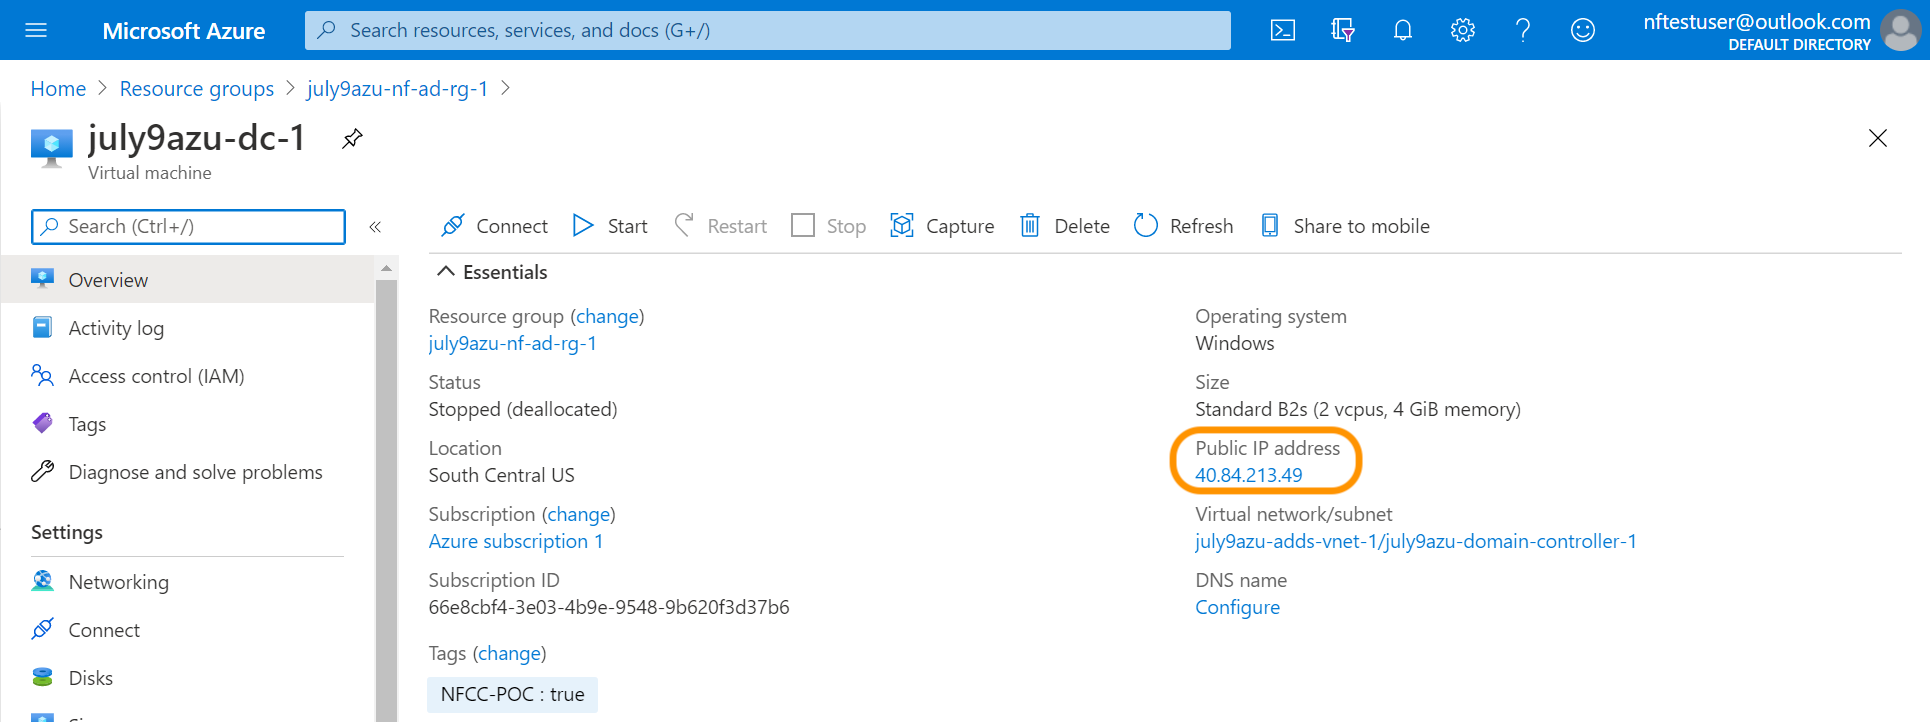
Login to the Microsoft Azure portal at https://portal.azure.com.
Navigate to the Virtual machines service. If it is not visible, search for it in the search box.

Click on the VM with name similar to “<customer_name>-dc-1” (in the resource group “<customer_name>-nf-ad-rg-1”).
Locate the section labeled Public IP address.
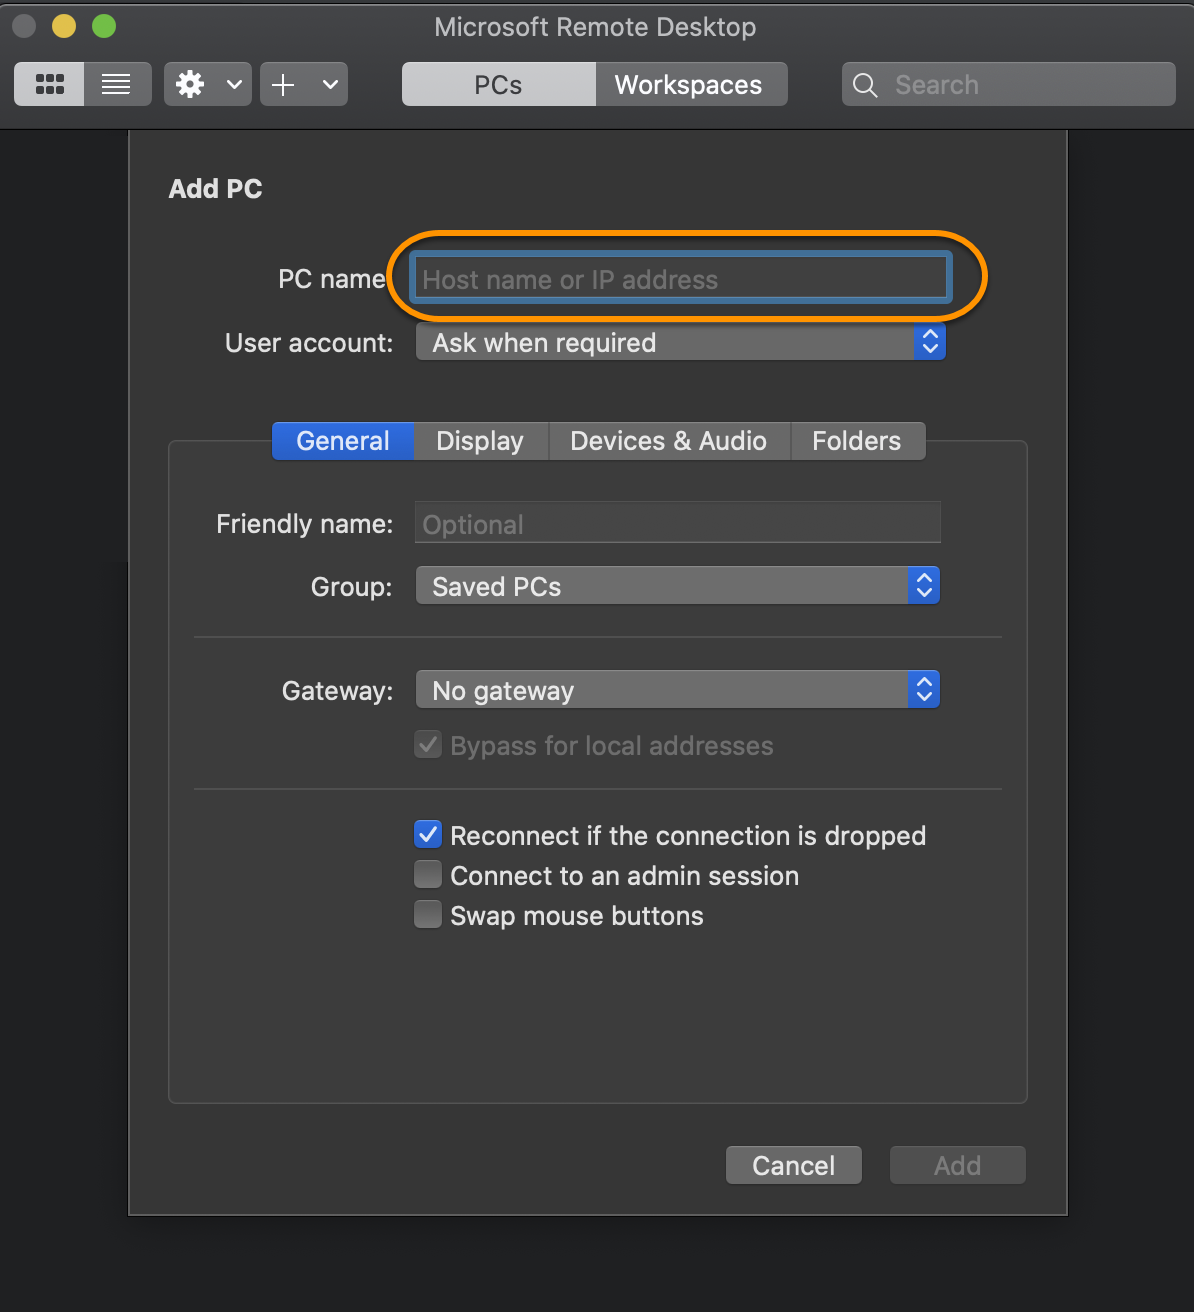
Connecting to the AD server on a Windows Operating System. Note: Skip to step 6 if you are on a MAC system.
- Open Remote Desktop Connection
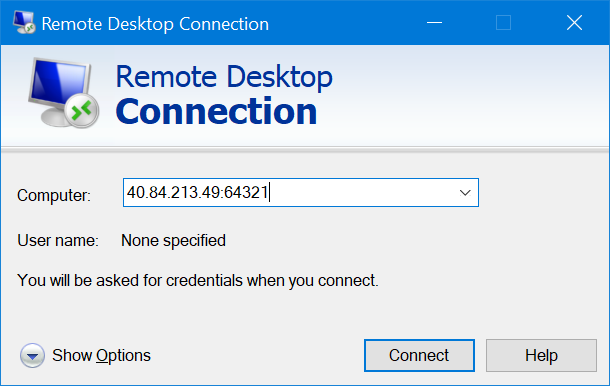
- Enter the Public IP address postfix with **:64321** inside the Computer text field.
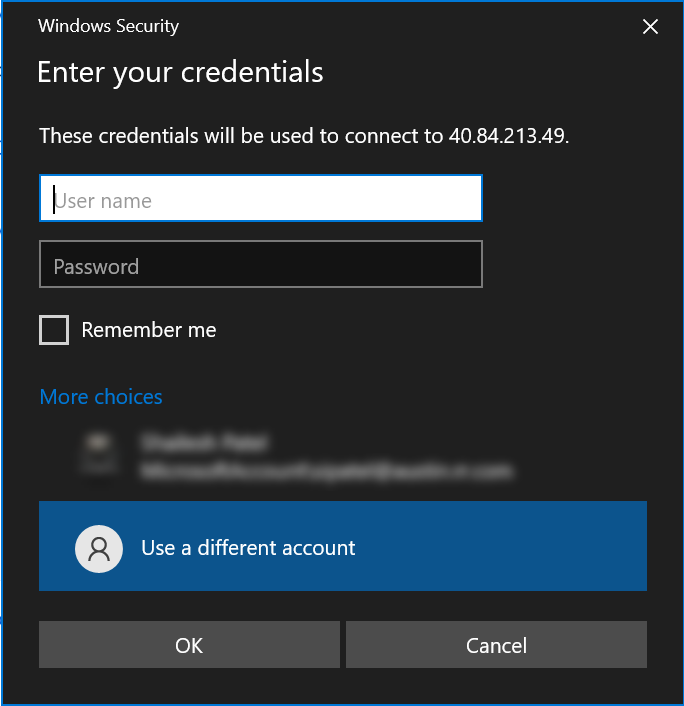
- When the application request credentials, type `appadmin@
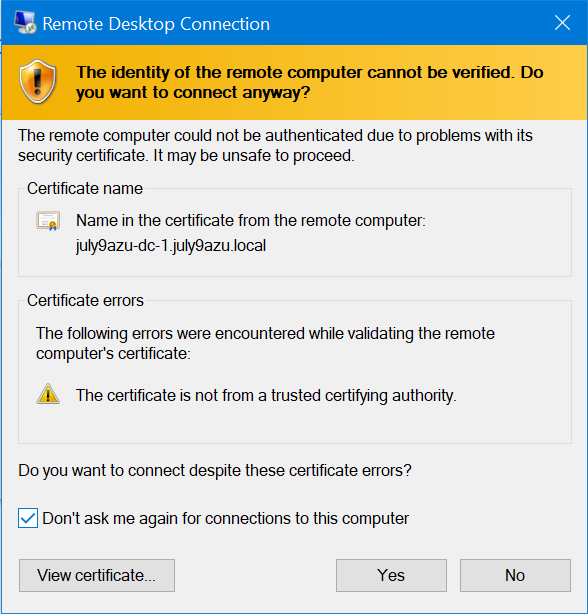
.local` for username and the password is the one that was created using the post configuration script. - Select the check box for **Don’t ask me again for connections to this computer** and select **Yes**.
- Skip to step 7.
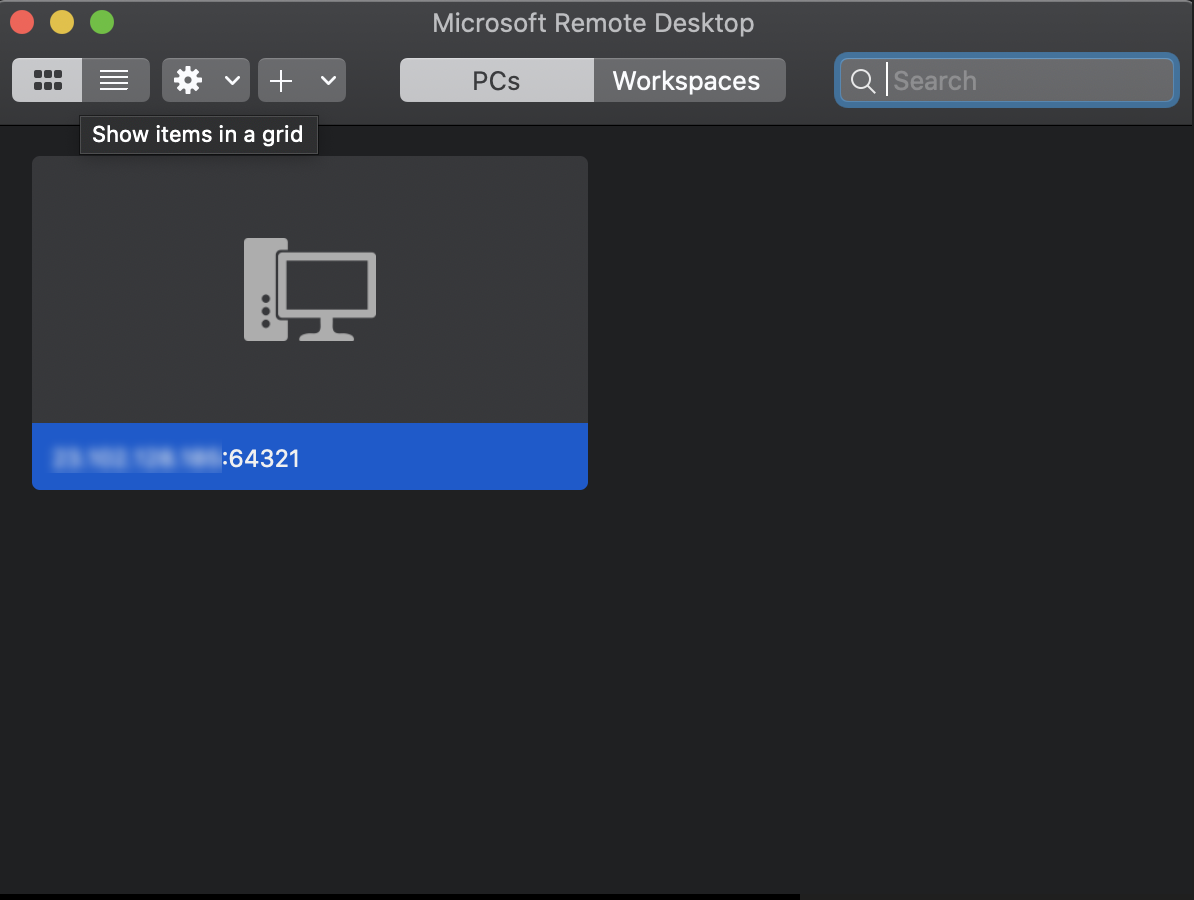
Connecting to the AD server using a MAC Operating System.
- Download the Microsoft Remote Desktop app from the App Store: https://apps.apple.com/us/app/microsoft-remote-desktop/id1295203466
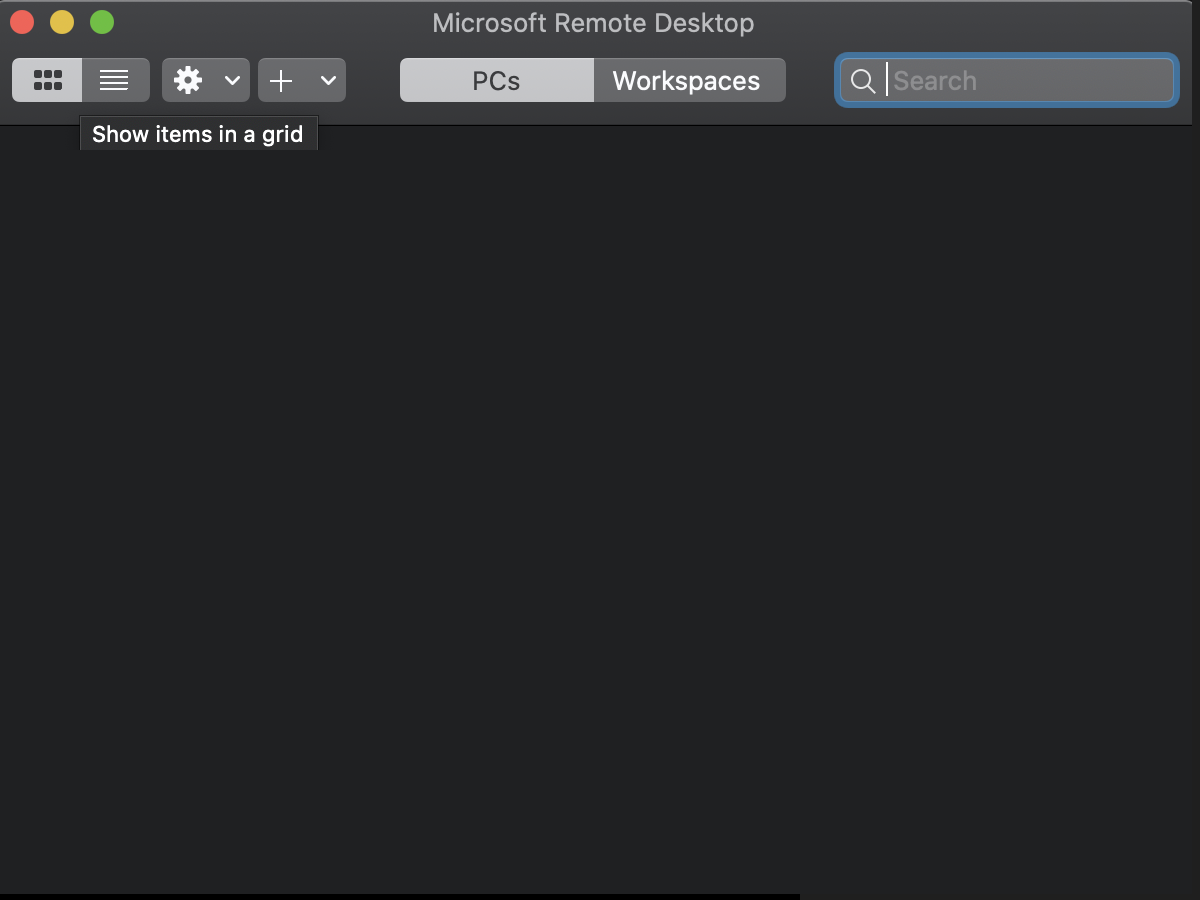
- Open the Microsoft Remote Desktop app
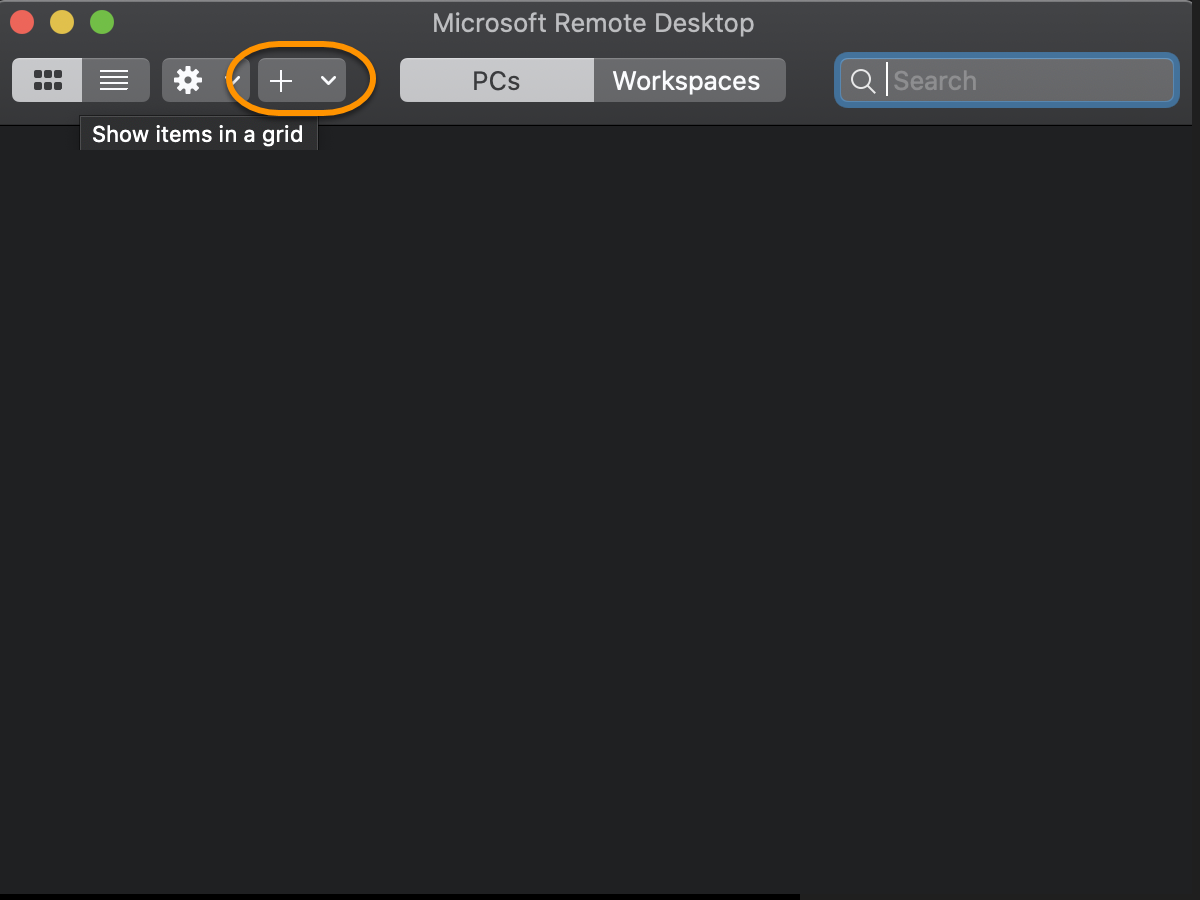
- Select + to add a new connection
(_Then choose **PC** option_) - Enter the Public IP address postfix with :64321 inside the PC name field. Then select Add.
- Select the newly created Remote Desktop Connection
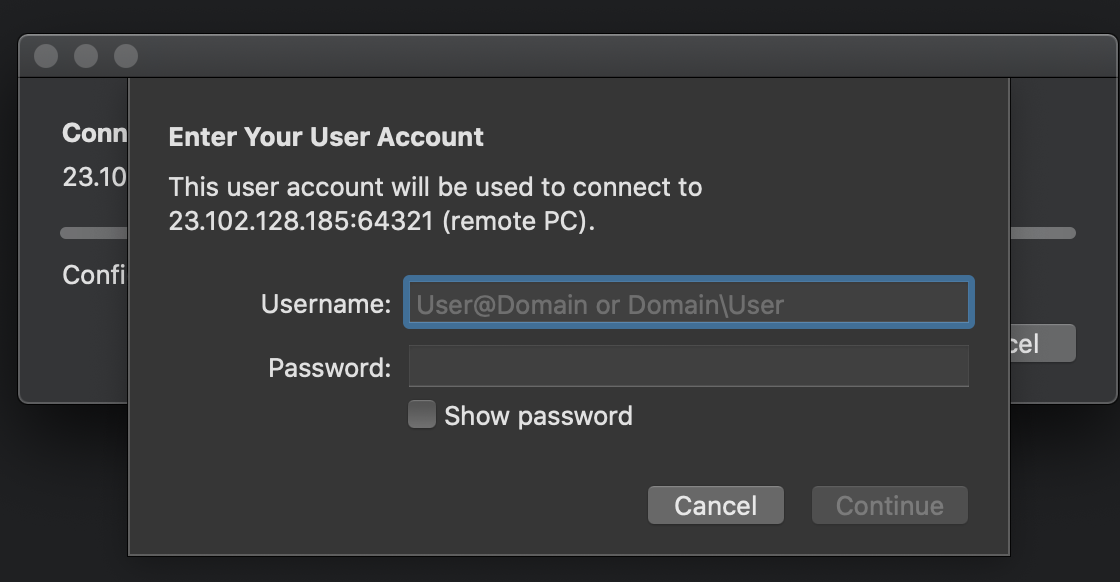
- When the application request credentials, type
appadmin@<customer_name>.localfor username and the password is the one that was created using the post configuration script. Then click continue.
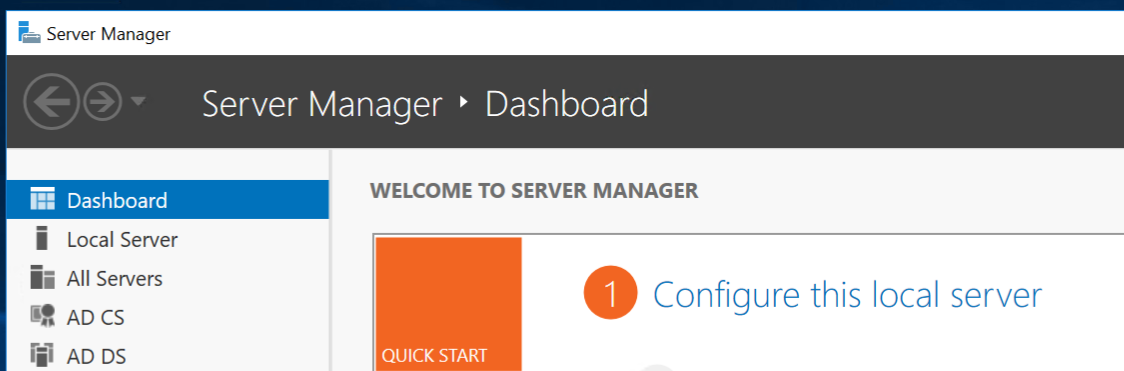
Open Server Manager and select Tools → Active Directory Users and Computers.

Right click on one of the five users created for the NFCC POC.
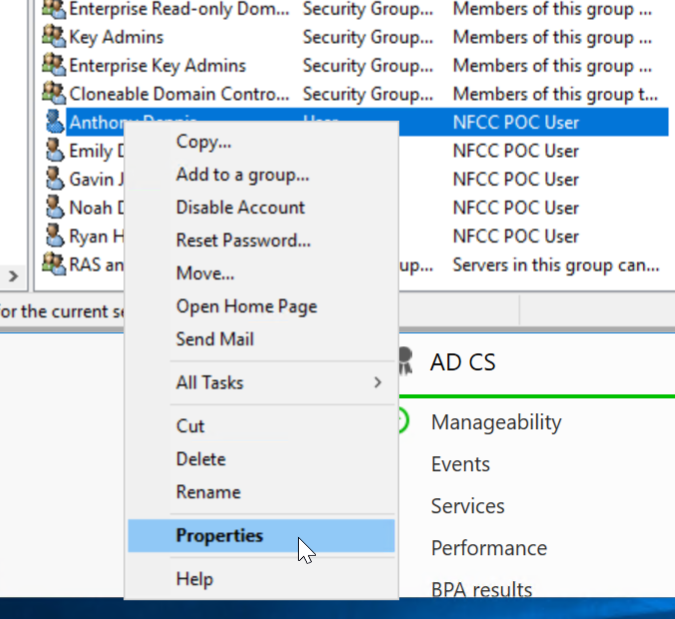
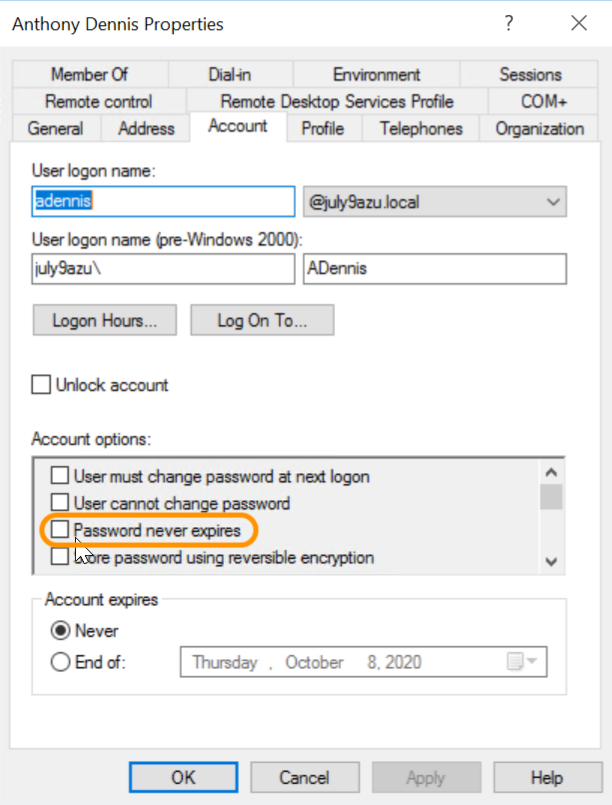
Select the Account tab and then under Account Options click the check box for Password never expires.

Toggle to Pass
Based on the test assessment criteria, follow these instructions to create conditions for a passed test.
Follow steps 1-11 on the previous Toggle to Fail section to navigate to Active Directory and Computers.
Un-check the box for Password never expires.
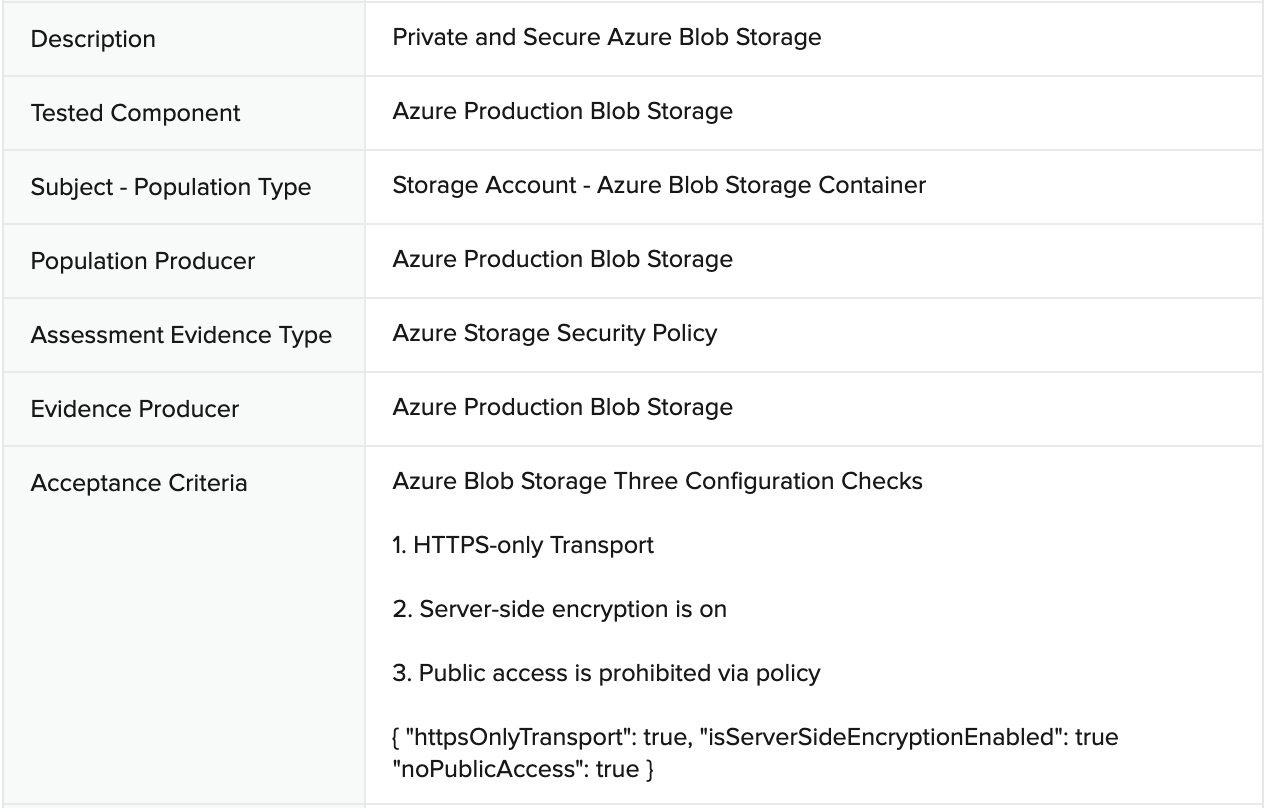
Control Test 2: Private and Secure Azure Blob Storage
Sample Auditee SOC 2 Control and Principles
SOC 2 Template Controls and Principles

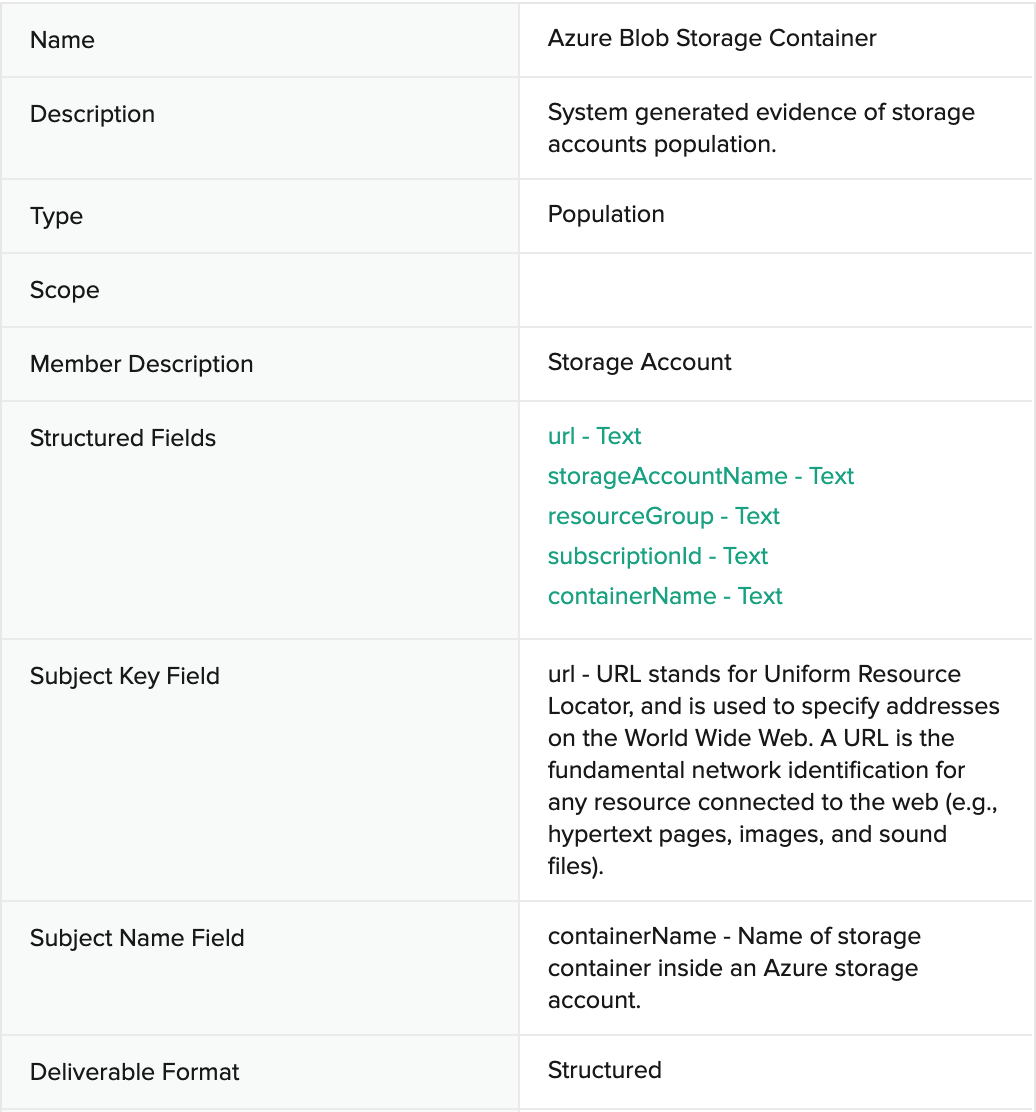
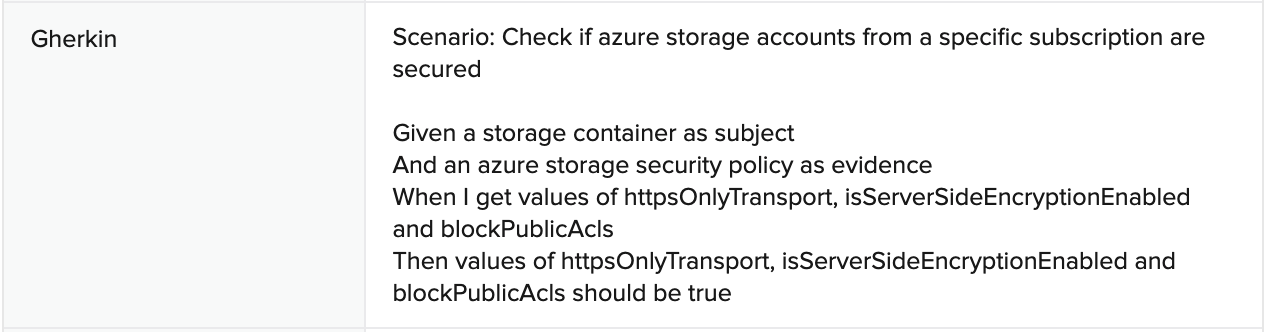
Population: Azure Blob Storage Container
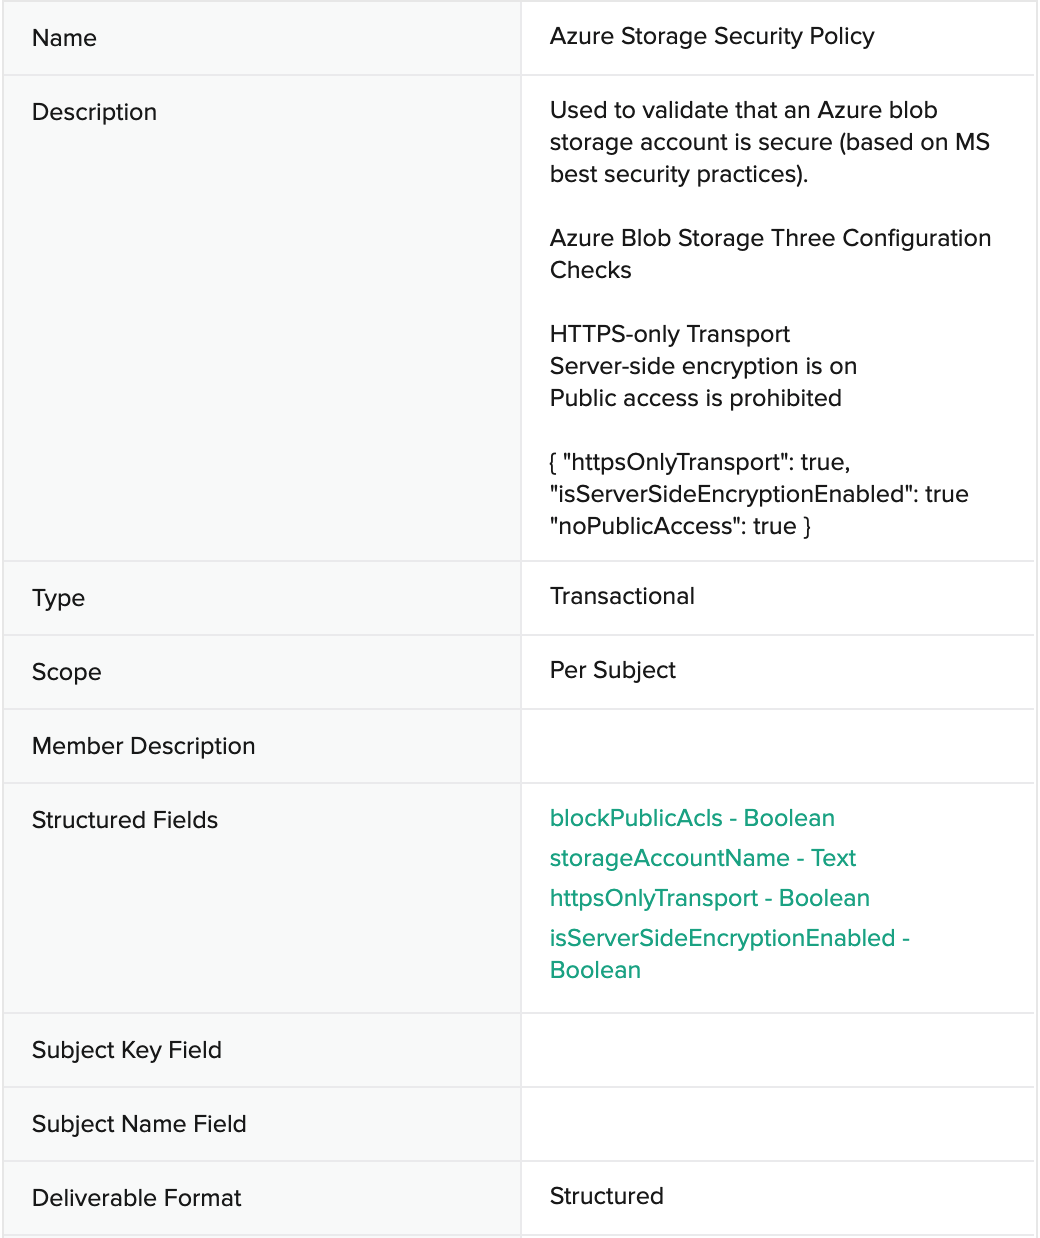
Evidence: Azure Storage Security Policy
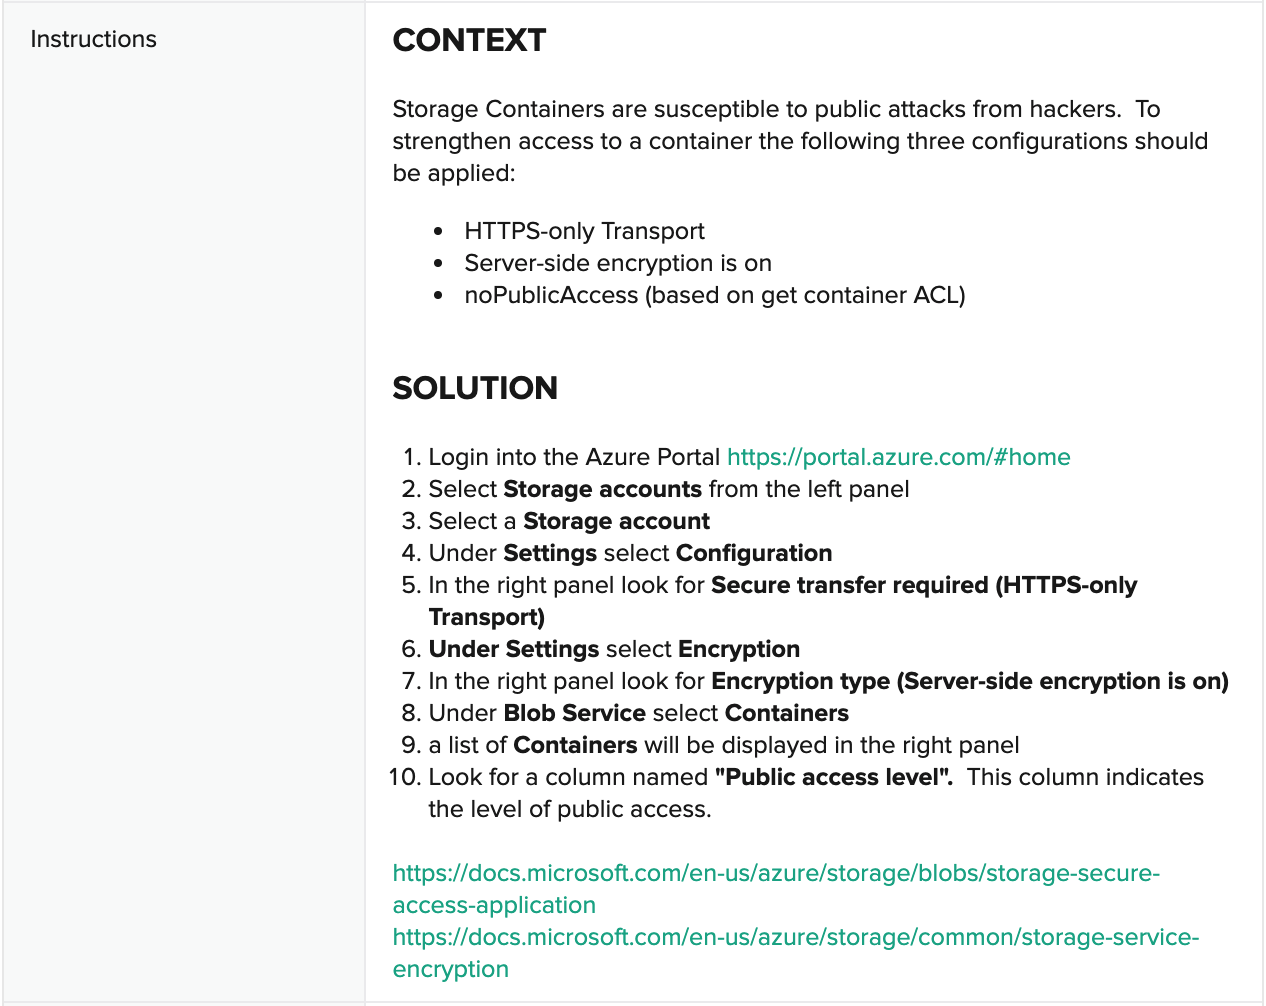
Evidence Collection KB: How to get Azure Storage Security Policy from Azure Blob Storage
Automated Assessment
Remediation Bot: Set Container Storage Security Configuration
In this case, the remediation bot will check and address each of the conditions associated with the Azure Storage Security Policy evidence. It will:
- Check and enable the container’s HTTPS-only Transport setting
- Check and enable Server-side encryption
- Check and set the container ACL to block public access
Toggling Test Outcome: Private and Secure Azure Blob Storage
Toggle to Fail
Based on the test assessment criteria, follow these instructions to create conditions for a failed test.
Login to the Azure portal at https://portal.azure.com.
Click on the Storage accounts icon from the Azure services list.

On the next screen, click on the account which is labeled like <customer_name>productionsa1” (with tag NFCC-POC:true).
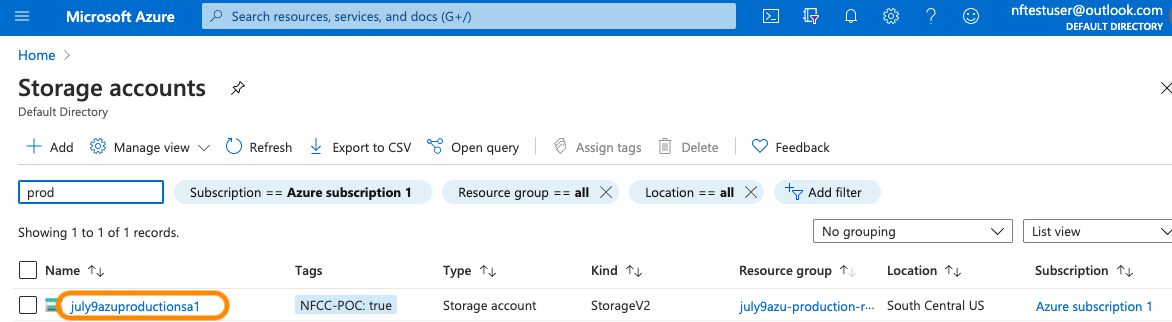
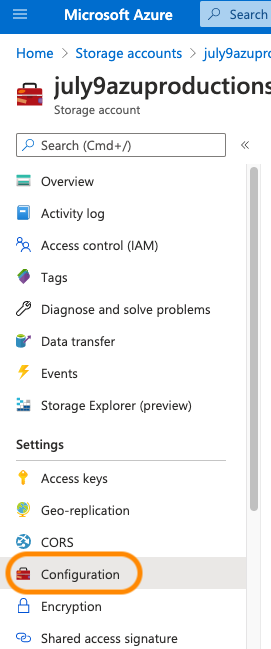
On the next screen, click on the Configuration menu item under Settings.
Set Secure transfer required to Disabled.
Set Allow Blob public access to Enabled.
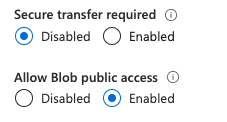
Click Save above the settings list.
Toggle to Pass
Based on the test assessment criteria, follow these instructions to create conditions for a passed test.
Follow steps 1-4 on the previous Toggle to Fail section to navigate to the configuration for the storage container account.
Set Secure transfer required to Enabled.
Set Allow Blob public access to Disabled.
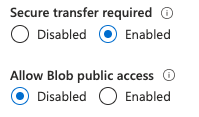
Click Save above the settings list.
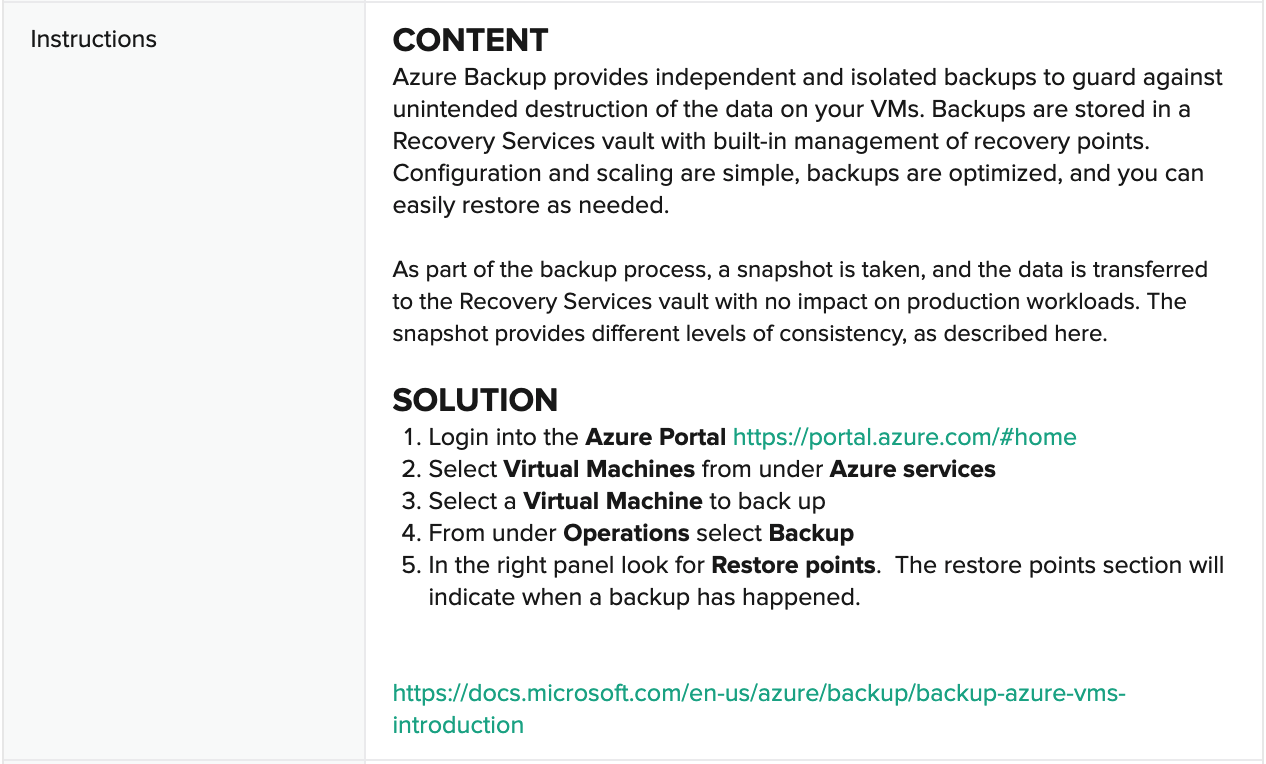
Control Test 3: Production Azure VMs Have Daily Backup Policy
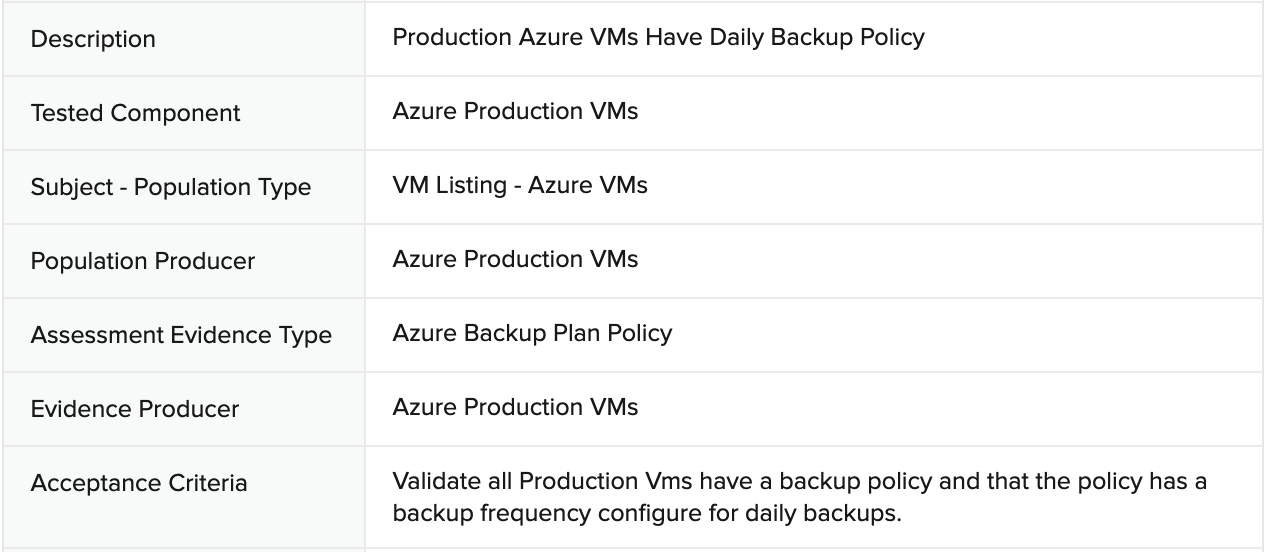
Sample Auditee SOC 2 Control and Principles
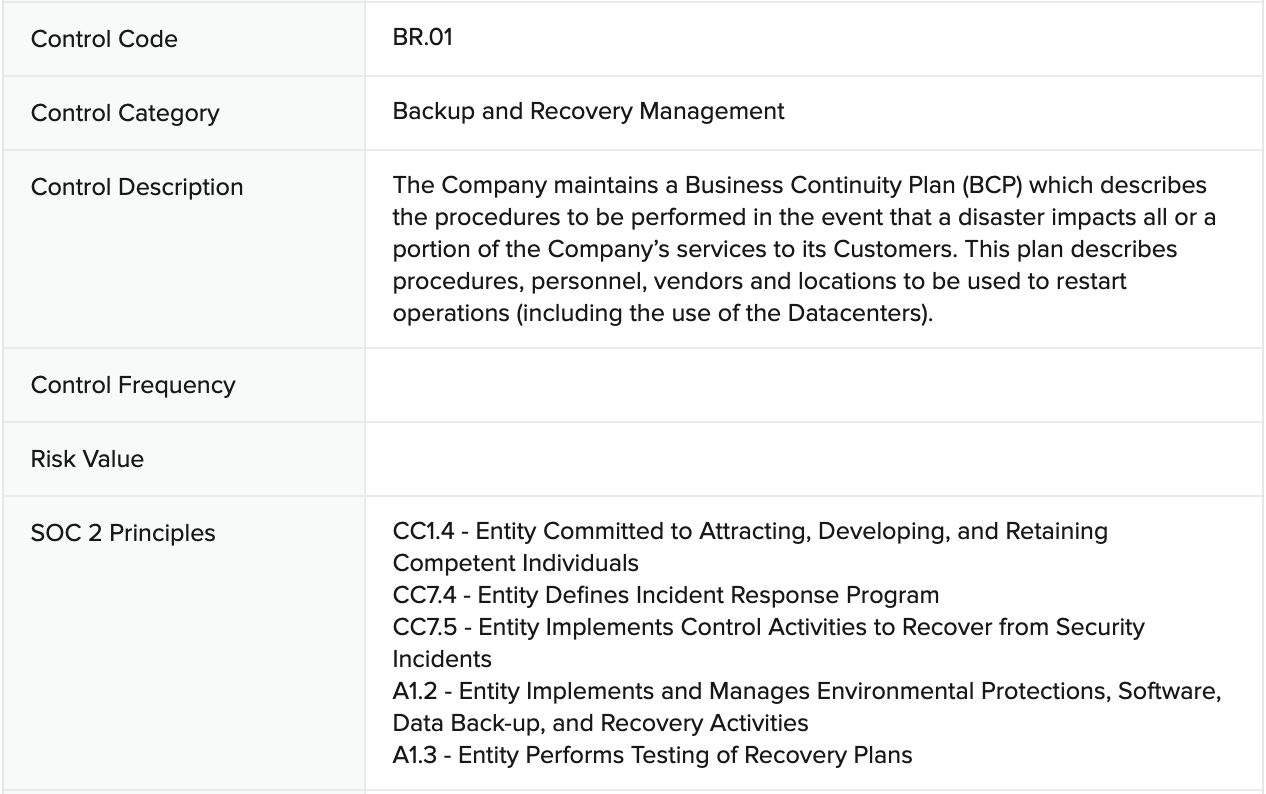
SOC 2 Template Controls and Principles

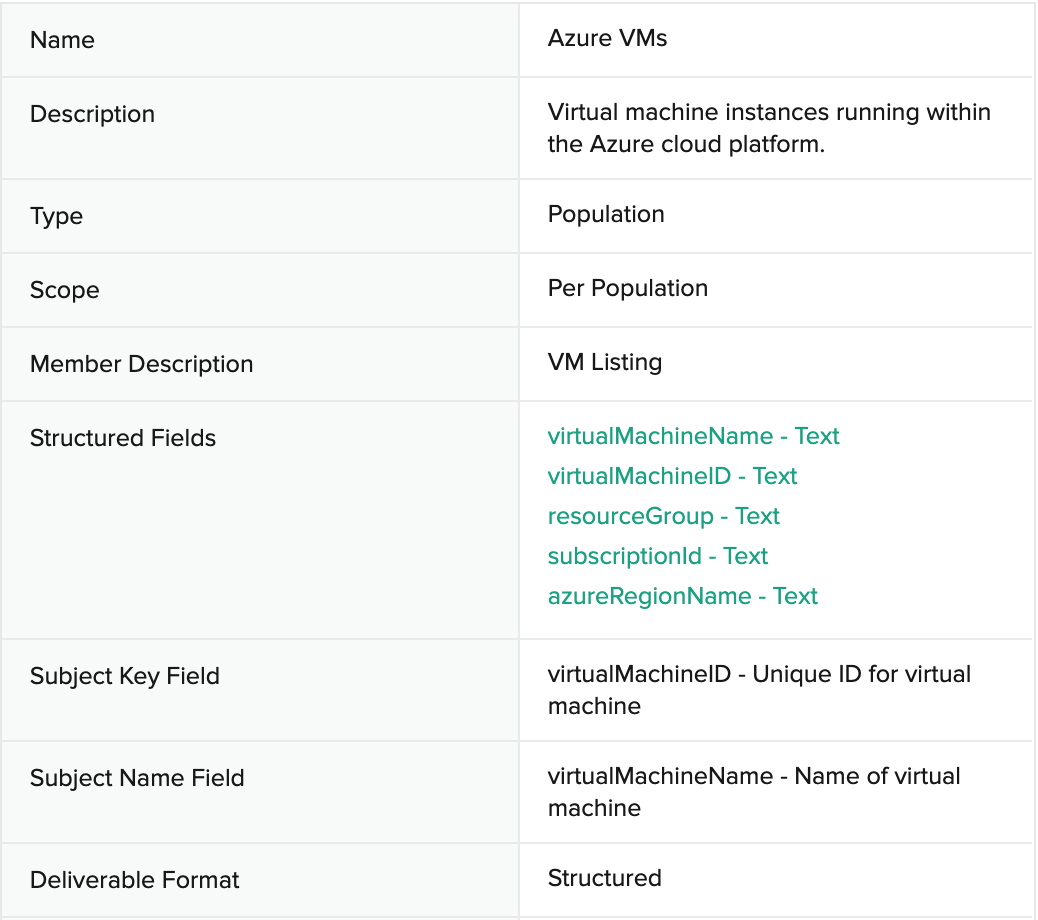
Population: Azure Production Virtual Machines (VMs)
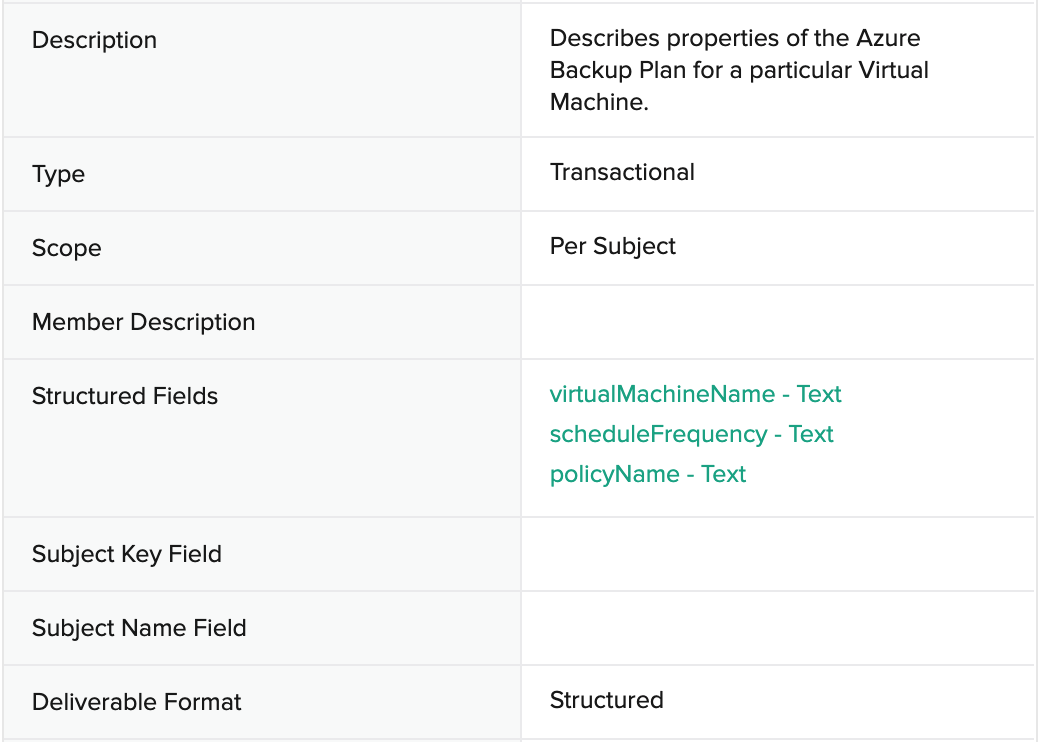
Evidence: Azure Backup Plan Policy
Evidence Collection KB: How to get Azure Backup Plan Policy from Microsoft Azure Backup
Automated Assessment

Remediation Bot: Set AWS Backup Plan Policy by Tag
The remediation bot will assign a backup policy to the VM with name “<customer_name>-daily-policy-1.” In the production CC service these can be customized.
Toggling Test Outcome: Production Azure VMs Have Daily Backup Policy
Toggle to Fail
Based on the test assessment criteria, follow these instructions to create conditions for a failed test.
Login to the Microsoft Azure portal at https://portal.azure.com.
Navigate to the Virtual machines service. If it is not visible, search for it in the search box.
Click on the VM with name similar to “<
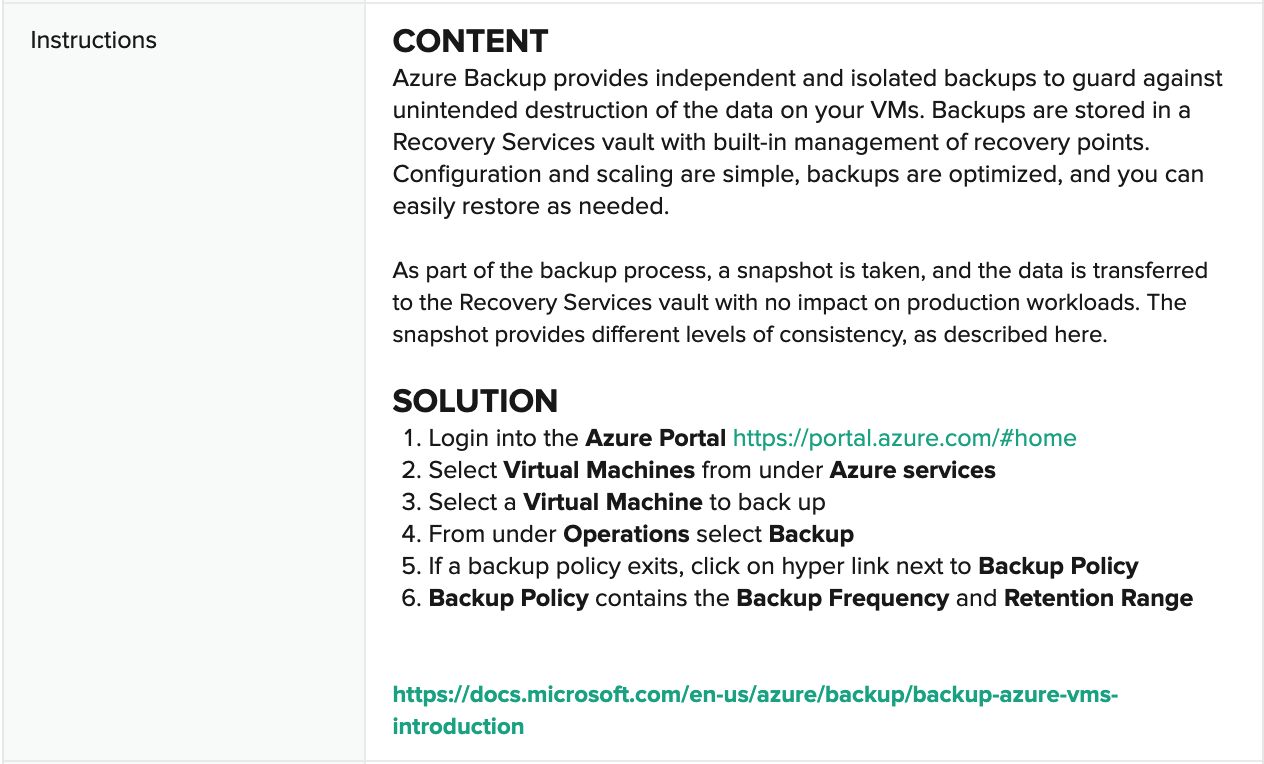
customer_name>-vm-1” (in the resource group “<customer_name>-production-rg-1”).Scroll down the left-hand menu and click on Backup.
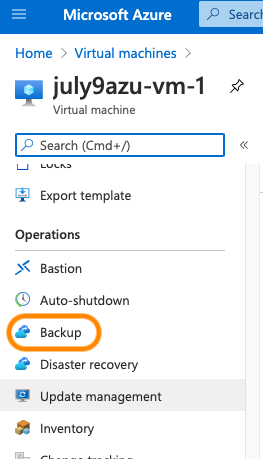
All snapshots within the last 48 hours must be removed to fail the test. To remove the snapshots, start by clicking Stop backup.
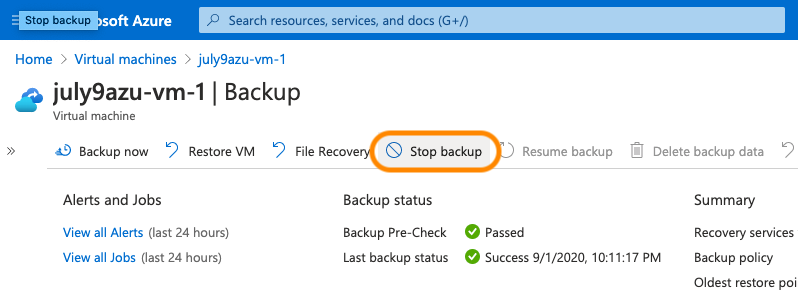
On the next screen, select option Delete Backup Data, type in (or copy/paste) the name of the VM into the following field, then click Stop backup.
Wait a few seconds for the operation to complete. You will see a pop-up message on the top right indicating the backup deletion has completed.
Toggle to Pass
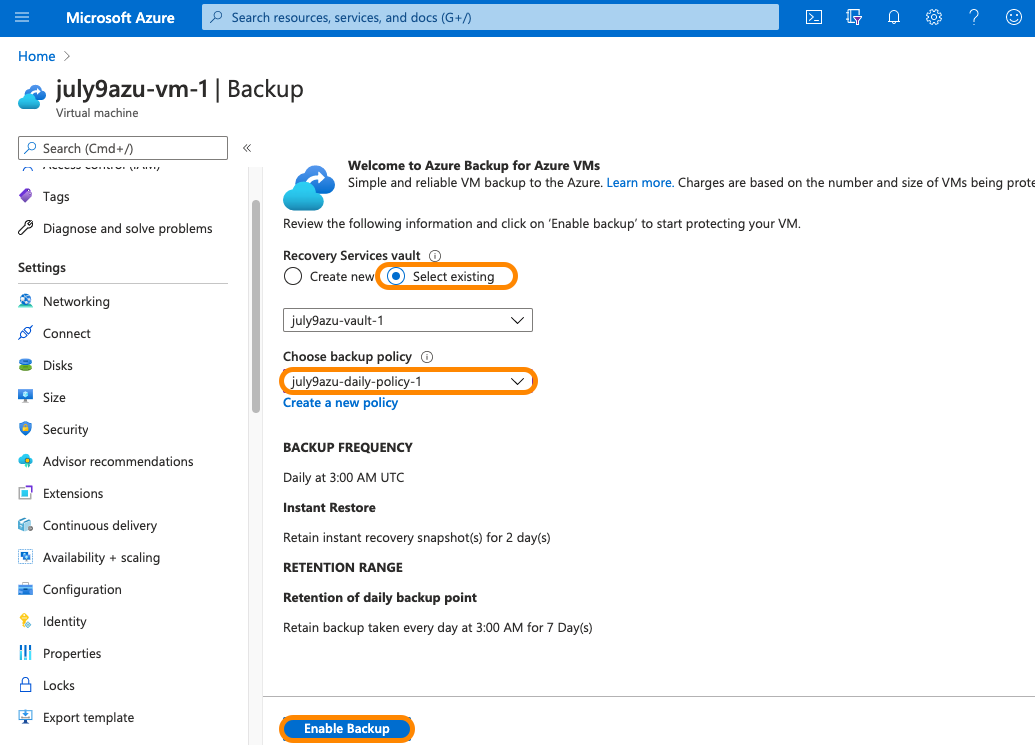
Based on the test assessment criteria, follow these instructions to create conditions for a passed test.
Follow steps 1-4 on the previous Toggle to Fail section to navigate to the Backup configuration for the test VM.
Click on the Select existing Recovery Services vault, and select the one with name “<
customer_name>-vault-1.”Choose the backup policy with name “<
customer_name>-daily-policy-1.”Click Enable Backup.
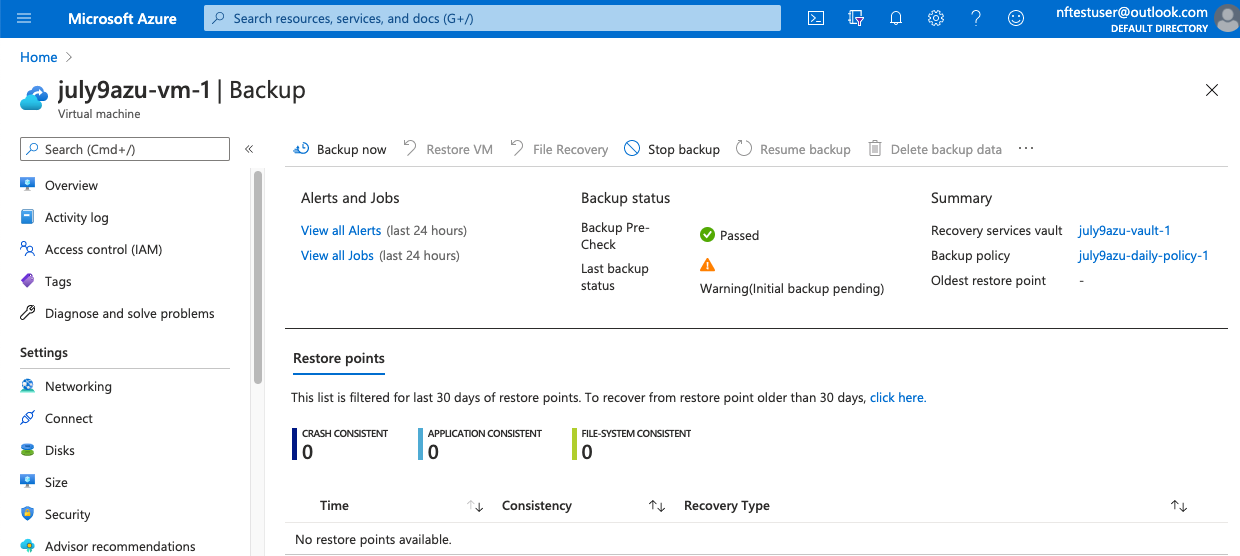
Wait a few seconds for the operation to complete. You will see a pop-up message on the top right indicating it has completed.
Refresh the Backup view for this VM again. In a few moments, it will show the Backup Pre-Check as Passed, and “Initial backup pending.” Note that this will apply the policy, and thereby address the failing test condition of not having a daily backup policy applied. This will not take an immediate snapshot however, as that is pending and based on the particular schedule.
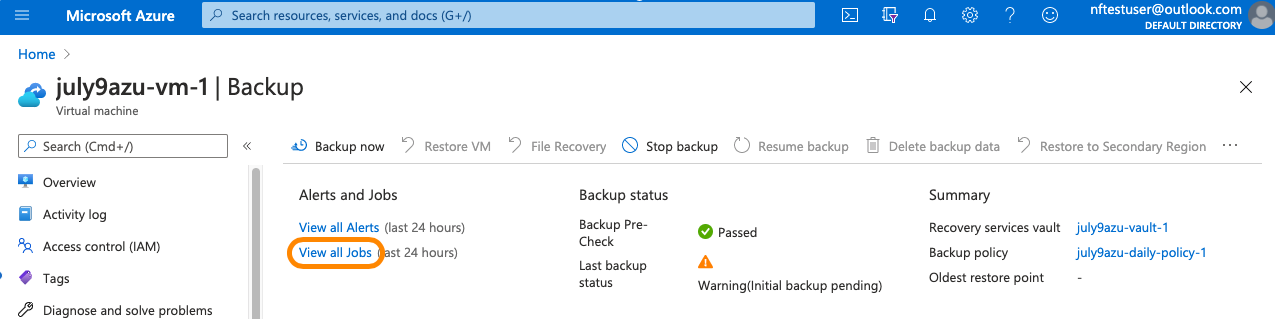
Control Test 4: Production Azure VMs Have RPO Less Than 48 Hours
Sample Auditee SOC 2 Control and Principles
SOC 2 Template Controls and Principles
Population: Azure Production Virtual Machines (VMs)

Evidence: VM Restore Points
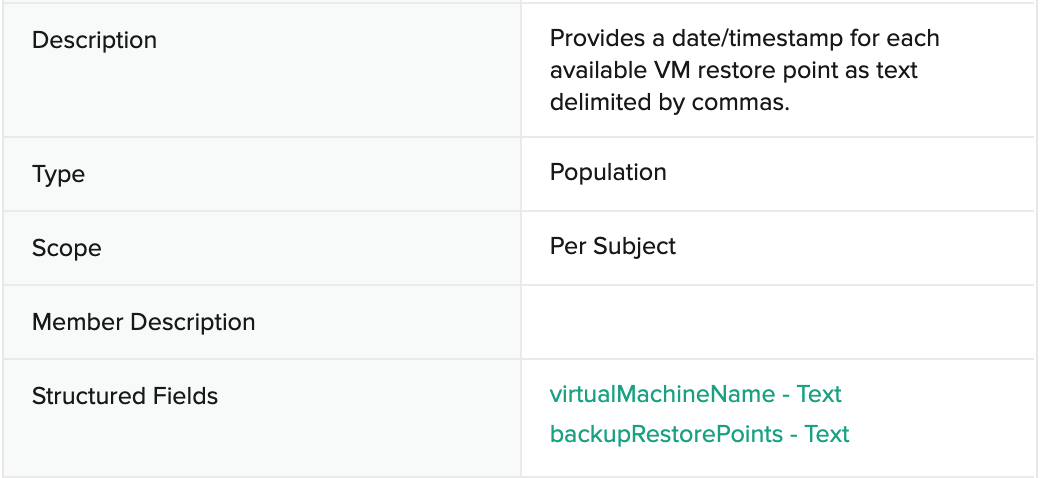
Evidence Collection KB: How to get VM Restore Points from Microsoft Azure Backup
Automated Assessment

Remediation Bot
The remediation bot will take a new backup of the VM, thereby bringing it into adherence to an RPO of less than 48 hours.
Toggling Test Outcome: Production Azure VMs Have RPO Less Than 48 Hours
Toggle to Fail
NOTE: These are the same instructions as the previous section’s Toggling Test Outcome: Production Azure VMs Have Daily Backup Policy.
Based on the test assessment criteria, follow these instructions to create conditions for a failed test.
Login to the Microsoft Azure portal at https://portal.azure.com.
Navigate to the Virtual machines service. If it is not visible, search for it in the search box.
Click on the VM with name similar to “<
customer_name>-vm-1” (in the resource group “<customer_name>-production-rg-1”).Scroll down the left-hand menu and click on Backup.
All snapshots within the last 48 hours must be removed to fail the test. To remove the snapshots, start by clicking Stop backup.
On the next screen, select option Delete Backup Data, type in (or copy/paste) the name of the VM into the following field, then click Stop backup.
Wait a few seconds for the operation to complete. You will see a pop-up message on the top right indicating the backup deletion has completed.
Toggle to Pass
Based on the test assessment criteria, follow these instructions to create conditions for a passed test.
Follow steps 1-4 on the previous Toggle to Fail section to navigate to the Backup configuration for the test VM.
Click on the Select existing Recovery Services vault, and select the one with name “<
customer_name>-vault-1.”Choose the backup policy with name “<
customer_name>-daily-policy-1.”Click Enable Backup.
Wait a few seconds for the operation to complete. You will see a pop-up message on the top right indicating it has completed.
Refresh the Backup view for this VM again. In a few moments, it will show the Backup Pre-Check as Passed, and “Initial backup pending.”
Click Backup now to take a new backup, then set a date in the “Retain Backup Till” field and click OK. Again, a notification will pop up in the upper-right indicating start of the backup job.
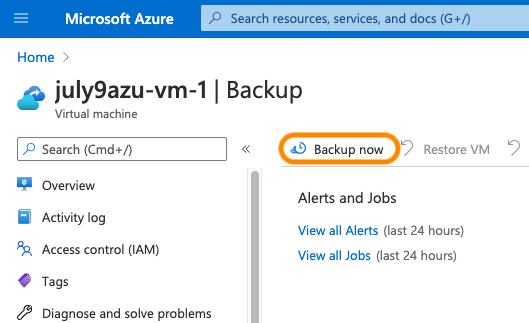
The backup itself can take a few minutes to complete. Click on the View all Jobs link to see the backup job status. Once complete, the VM will return to a passing state of an RPO within 48 hours.
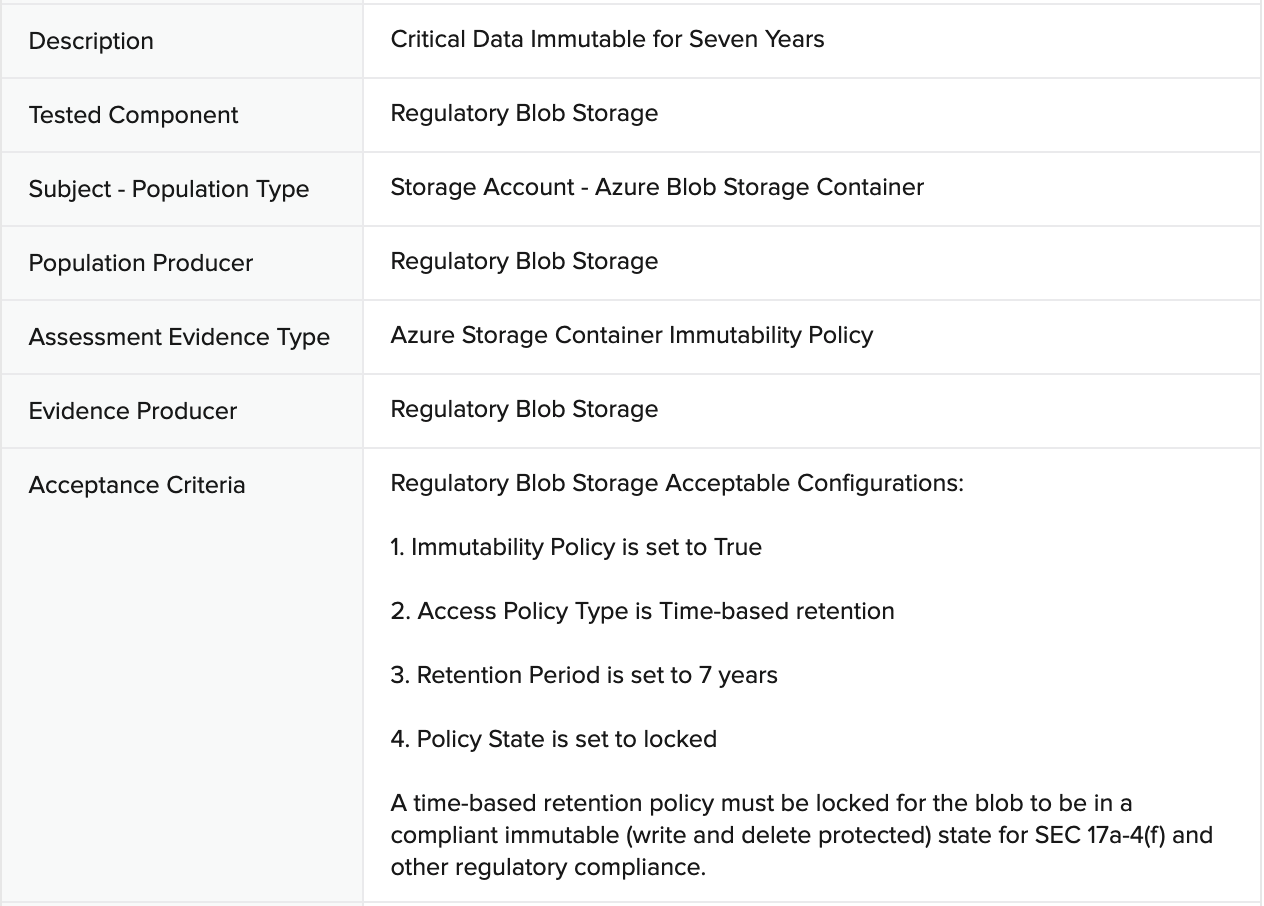
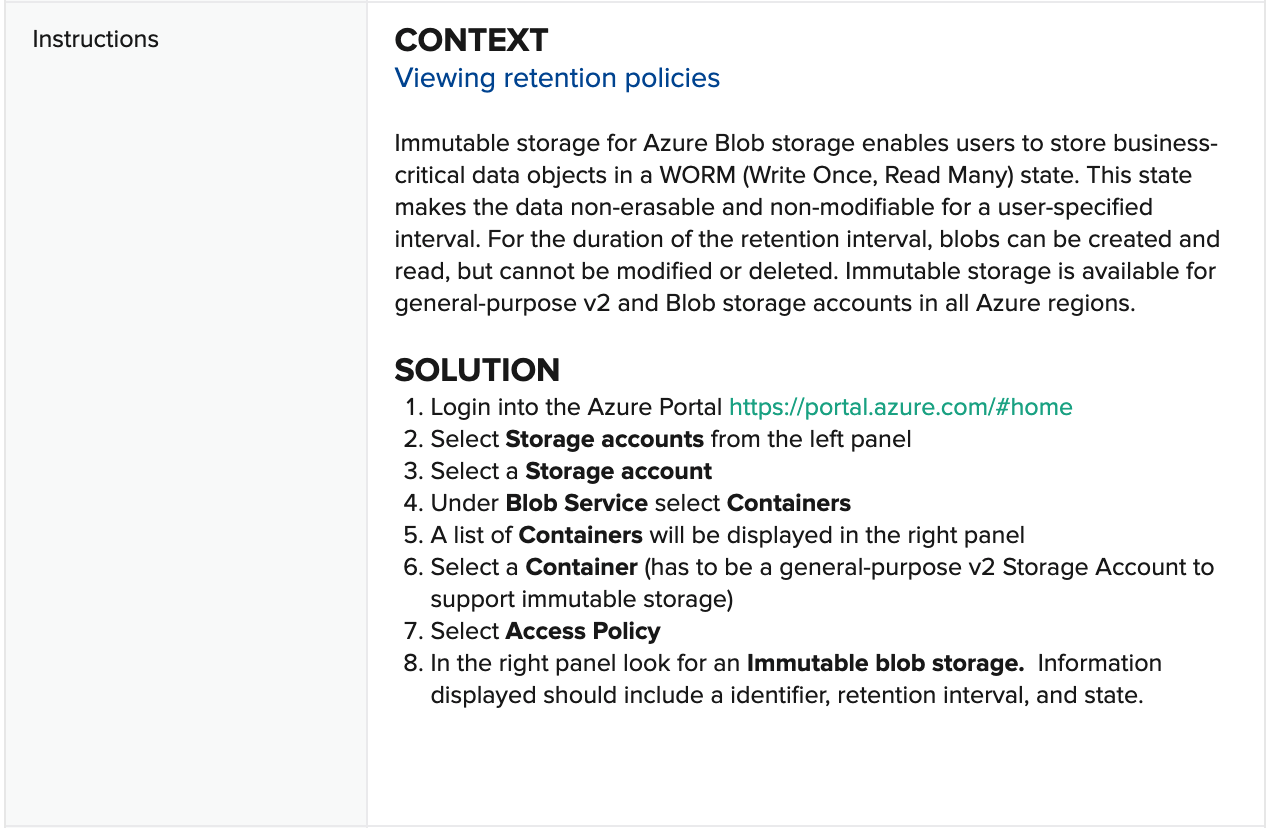
Control Test 5: Azure Blob Storage - Critical Data Immutable for Seven Years
Sample Auditee SOC 2 Control and Principles
While not representative of a SOC 2 Control, it is relevant to the storage requirements of three key financial industry regulations: the CFTC Rule 1.31(c)-(d), FINRA Rule 4511, and SEC Rule 17a-4.
SOC 2 Template Controls and Principles
See above.
Population: Azure Blob Storage Container
Evidence: Azure Storage Container Immutability Policy
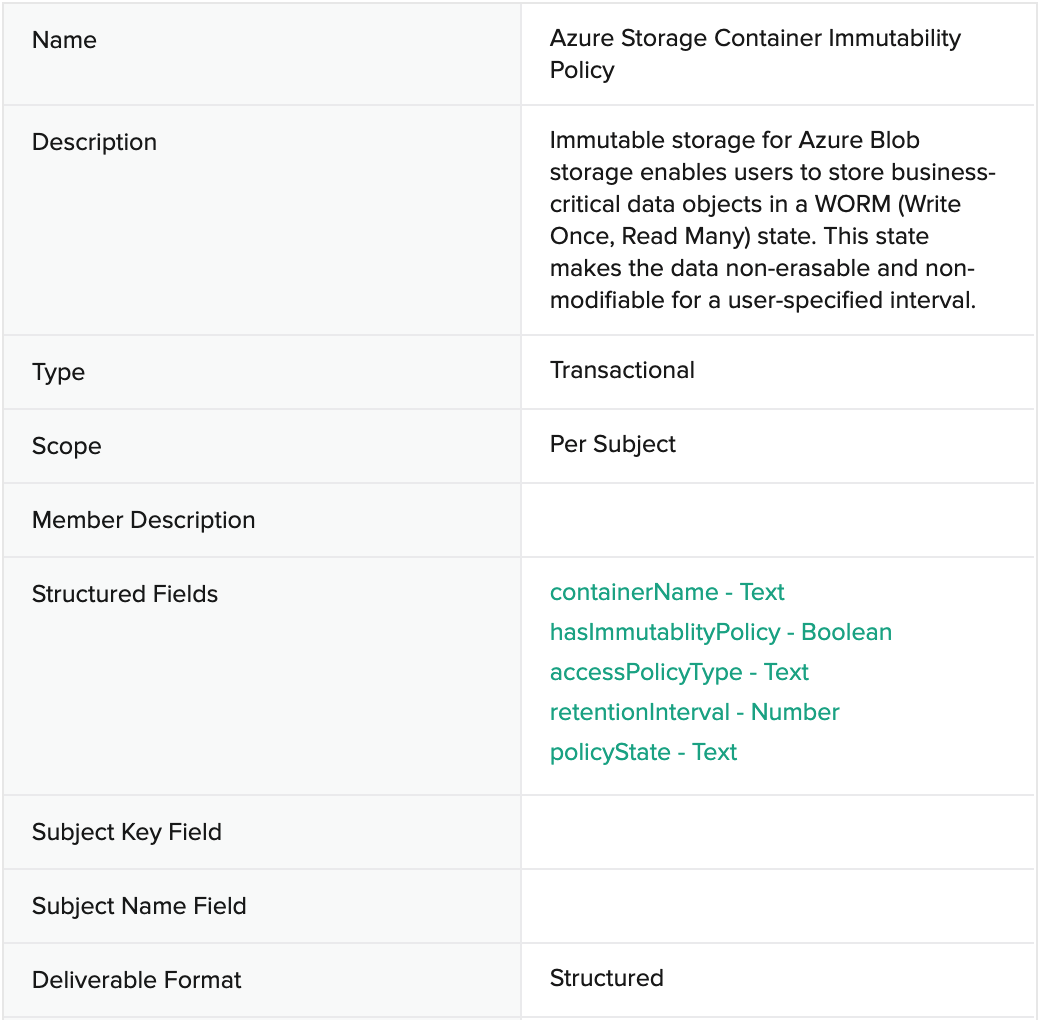
Evidence Collection KB: How to get Azure Storage Container Immutability Policy from Azure Blob Storage
Automated Assessment
Remediation Bot: Secure AWS RDS DBaaS Instance
Due to the way Immutable blob storage policy is designed in Azure, once they are locked they can not be changed. There is not a remediation bot for this test case.
Toggling Test Outcome: Azure Blob Storage - Critical Data Immutable for Seven Years
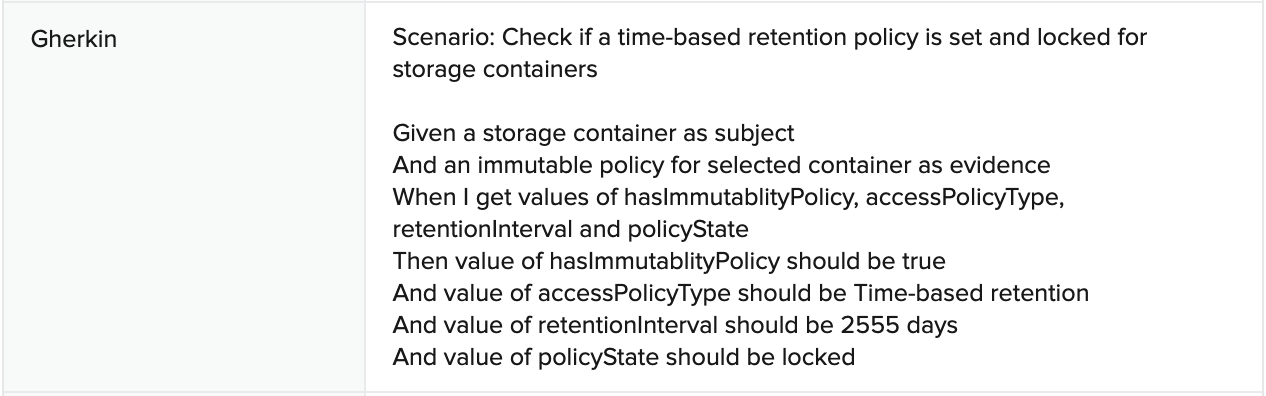
A time-based retention policy must be locked for the blob to be in a compliant immutable (write and delete protected) state for SEC 17a-4(f) and other regulatory compliance. Once the policy is locked, a user is unable to change the properties of the blob storage container. In order to toggle a test to fail, you will need to create a new container. Below are instructions on how to create an additional container without a policy, causing the Control Test to fail. Following that are instructions on how to create an immutable policy for the new container created, which will pass the Control Test.
Toggle to Fail
Based on the test assessment criteria, follow these instructions to create conditions for a failed test.
Login to the Microsoft Azure portal at https://portal.azure.com.
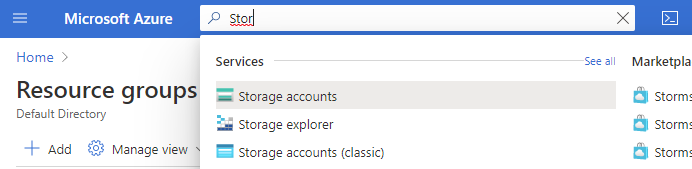
Navigate to the Storage accounts. If it is not visible, search for it in the search box.
Click on the Storage account with name similar to “<customer_name>regulatorysa1”.
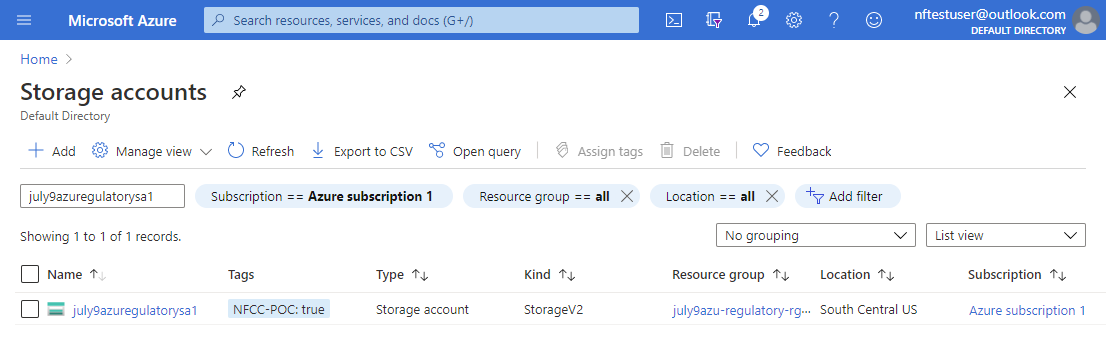
Select Containers
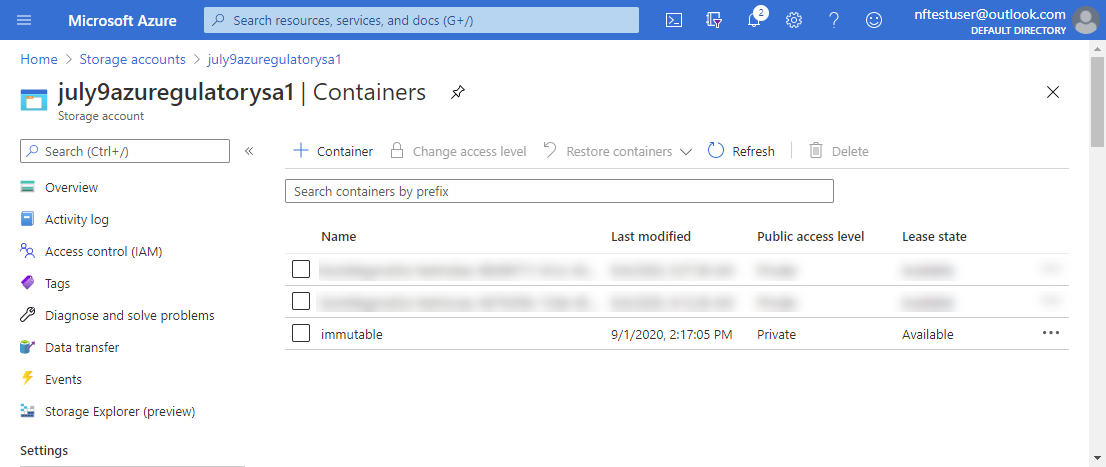
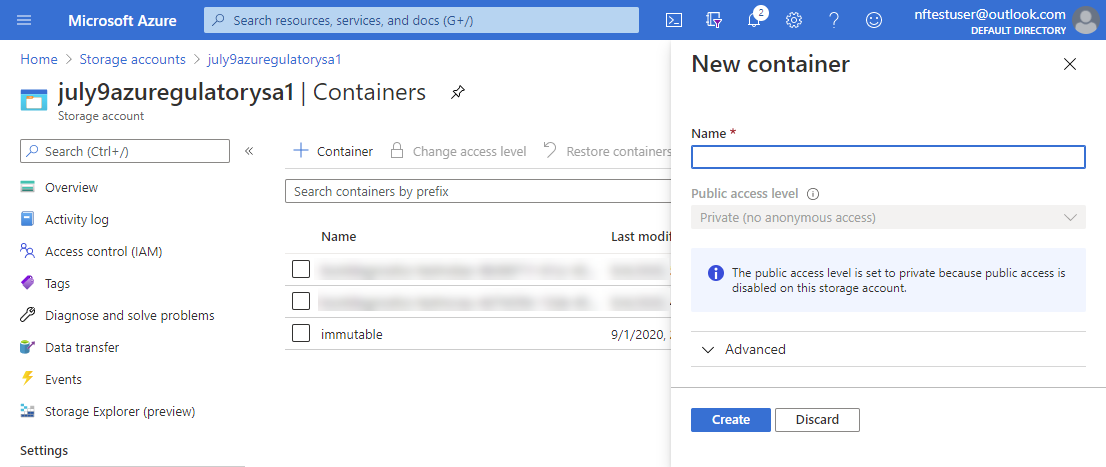
Select +Containers
Enter a name for the new container. At this point since there is not a immutable policy created, the test case will fail.
Toggle to Pass
Use the container created under “Toggle to Fail”.
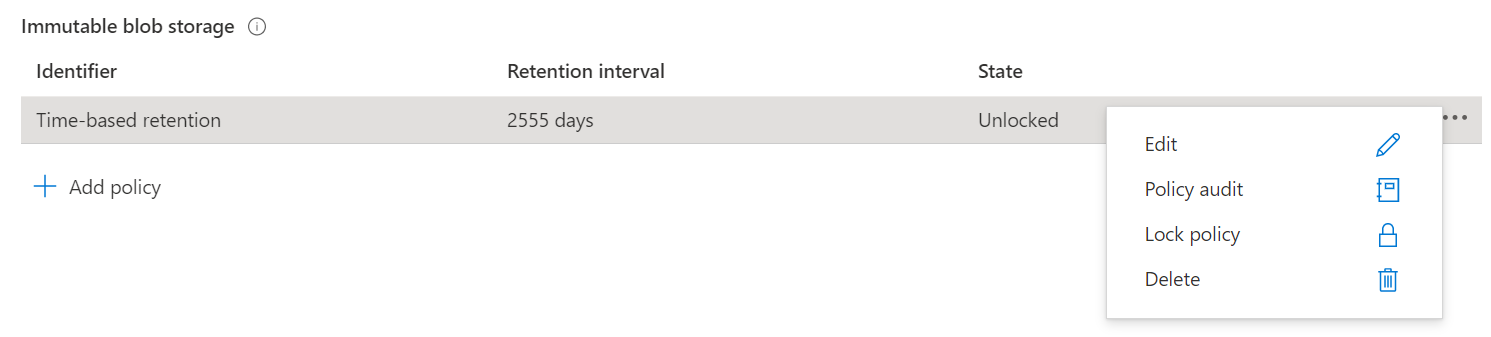
Select Access policy from Settings in the left panel.
Click + Add policy under Immutable blob storage.
Change the Policy Type to Time-based retention and set the retention period to 2555 days.

Select the three dots to the right of the policy and select Lock policy.
Appendix A
AWS Functions and Evidence Types
Azure Collection Functions / Bots
- azure-getAllVMS
- azure-getVmRestorePoints
- azure-getVmBackupPolicy
- azure-getBlobStorageContainers
- azure-getContainerImmutabilityPolicy
- azure-getStorageSecurityConfig
- activedirectory-getEnabledUsers
Azure Remediation Functions / Bots
- activedirectory-enablePasswordExpiration
- azure-createVmSnapshot
- azure-setStoragesecurityConfig
- azure-setVmBackupPlanPolicy
Related Evidence Types
- Asset Snapshots
- VM Restore Points
- Azure Backup Plan Policy
- Azure Storage Container Immutability Policy
- Azure Storage Security Policy
- Active AD User Report